Block Boundary Suggestion Project - Delineation
The Redistricting Data Program
2026RDP_BBSP_Standalone_UserGuide_NSC_final_approved
Block Boundary Suggestion Project - Delineation
OMB: 0607-0988
2026RDP_BBSP_Standalone_UserGuide_NSC_final_approved
Standalone (i.e.,
desktop) version of the Geographic Update Partnership Software
January 2026
This page intentionally left blank.
Table of Contents
SECTION 1. Block Boundary Suggestion Project Overview 1
SECTION 2. Suggested Workflow 3
2.4 Linear Feature Extension Review 6
2.6 Block Boundary Suggestion Flagging 7
2.6.1 Block Boundary Criteria 8
2.6.2 Assigning a “Must Hold” Flag 9
2.6.3 Assigning a “Do Not Hold” Flag 9
2.7 Block Area Grouping Delineation 10
2.9 Potential Small Block Check 10
2.10 Review Change Polygons and Geography Review 10
2.11 Submitting Updates to the Census Bureau 11
SECTION 3. Getting Started 12
3.2 Creating a New GUPS Project 13
3.2.1 Loading Census Partnership and Prototype Block Shapefiles 14
3.2.2 Census Web Option (Recommended) 15
3.2.3.1 Creating the My Computer Folder 16
3.2.3.2 Download the Partnership Shapefiles 16
3.2.3.3 Download the Prototype Block Shapefiles from FTP Site 17
3.3 Opening an Existing GUPS Project 18
3.3.1 Opening a Shared Project 18
3.4 Getting Started in GUPS 19
3.4.1 Layers, Status Bar, and Map View 19
3.4.2.4 Additional Tools for BBSP 25
3.4.3 GUPS Data Settings Tool 25
SECTION 4. BBSP Update Activities in GUPS 27
4.1.1 Adding a Linear Feature 28
4.1.2 Deleting a Linear Feature 28
4.1.3 Restoring a Deleted Linear Feature 29
4.1.4 Modifying Linear Feature Attributes 29
4.1.5 Splitting a Linear Feature 29
4.2.1 Modify Area Feature Tool 30
4.2.2 Boundary Correction by Adding Area to Area Landmark 32
4.2.3 Boundary Correction by Removing Area from an Area Landmark 33
4.2.4 Creating a New Area Landmark 34
4.2.5 Deleting an Area Landmark 35
4.2.6 Modifying an Area Landmark’s Attribution 35
4.3.1 Adding Area through Legal Changes (Annexation) 37
4.3.2 Removing Area through Legal Changes (De-annexation) 39
4.3.3 Boundary Correction by Adding Area to a Legal Entity 41
4.3.4 Boundary Correction by Removing Area from a Legal Entity 42
4.3.5 Adding a New Legal Entity 43
4.3.6 Deleting a Legal Entity 44
4.4 Linear Feature Extension Review 45
4.4.1 Reviewing and Assigning Flags to 2020 Linear Feature Extensions 46
4.4.1.1 Assigning a “Must Hold” Flag 47
4.4.1.2 Assigning a “Do Not Hold” Flag 47
4.4.1.3 Ignoring a 2020 Linear Feature Extension 47
4.6 Block Boundary Suggestion Flagging 48
4.6.1 Block Boundary Criteria 49
4.6.2.1 Assigning a “Must Hold” Flag 53
4.6.3.1 Assigning a “Do Not Hold” Flag 54
4.6.4 Removing a “Must Hold” or “Do Not Hold” Flag 55
4.6.5 Digitizing a New Linear Feature Extension 55
4.7 Block Area Grouping Delineation 56
4.7.1 Creating a Block Area Grouping 56
4.7.2 Deleting a Block Area Grouping 57
4.9 Potential Small Block Check 58
4.10 Review Change Polygon and Geography Review 60
4.10.1 Reviewing Change Polygons 60
4.10.2 Conducting Geography Review 62
4.11 Submitting Updates to the Census Bureau 64
4.11.1 Export Functionality 65
4.11.2 Creating a Share with Another Participant File 65
4.11.3 Creating a Submission for the Census Bureau 66
SECTION 5. Submit Changes to the Census Bureau 68
Appendix A Partnership Shapefile Data Dictionary A-1
Appendix B MTFCC Descriptions B-1
List of tables
Table 1: 2030 Census Planned Block Boundaries by MAF/TIGER Feature Class Code (MTFCC) 1
Table 2: MTFCCs for Linear Feature Updates 4
Table 3: Block Size Indicator Values 7
Table 4: Description of Block Boundary Flagging Fields 8
Table 5: System Requirements for GUPS 12
Table 6: GUPS Installation Process 12
Table 7: Creating a New GUPS Project 14
Table 8: Creating the My Computer Folder 16
Table 9: Downloading and Loading the Shapefiles for the My Computer Option 17
Table 10: Opening an Existing GUPS Project 18
Table 11: Opening a Share with Participant Zip File 18
Table 12: Standard Toolbar Description 20
Table 13: BBSP Toolbar Description 22
Table 14: Add Data Toolbar Description 24
Table 15: Description of Other Important Tools 25
Table 16: Deleting Projects in GUPS 26
Table 17: How to Add a Linear Feature 28
Table 18: How to Delete a Linear Feature 28
Table 19: How to Restore a Deleted Linear Feature 29
Table 20: How to Modify a Linear Feature 29
Table 21: How to Split a Linear Feature 29
Table 22: Select Features by Area or Single Click Options in Modify Area Feature Tool 31
Table 23: How to Add Area to an Area Landmark 33
Table 24: How to Remove Area from an Area Landmark 33
Table 25: How to Create a New Area Landmark 34
Table 26: How to Delete an Area Landmark 35
Table 27: How to Modify an Area Landmark 35
Table 28: How to Perform an Annexation 38
Table 29: How to Perform a De-Annexation 40
Table 30: How to Perform a Boundary Correction by Adding Area 41
Table 31: How to Perform a Boundary Correction by Removing Area 42
Table 32: How to Add a New Legal Entity 43
Table 33: How to Delete a Legal Entity 44
Table 34: How to Review 2020 Linear Feature Extensions 46
Table 35: How to Assign a "Must Hold" flag to a 2020 Linear Feature Extension 47
Table 36: Block Size Indicator Values 48
Table 37: Description of Block Boundary Flagging Fields 49
Table 38: Block Boundary Flagging Symbology 50
Table 39: How to Assign a “Must Hold” Flag 53
Table 40: How to Assign a “Do Not Hold” Flag 54
Table 41: How to Remove a Flag 55
Table 42: How to Digitize a New Linear Feature Extension 55
Table 43: How to Create a Block Area Grouping 56
Table 44: How to Delete a Block Area Grouping 57
Table 45: How to Review Block Boundary Suggestions 58
Table 46: Running the Potential Small Block Check 59
Table 47: How to Review Change Polygons 62
Table 48: How to Perform a Geography Review 64
Table 49: How to Create a Share with Participant Export 65
Table 50: How to Create an Export for Census 67
Table 51: State Shapefile Names A-1
Table 52: County Shapefile Names A-2
Table 53: All Lines (Edges) Shapefile (PVS_25_v2_edges) A-4
Table 54: Area Landmark Shapefile (PVS_25_v2_arealm) A-5
Table 55: Block Area Grouping Shapefile (PVS_25_v2_bag) A-6
Table 56: Census Blocks- 2020 (PVS_25_v2_tabblock2020) A-6
Table 57: Congressional Districts (PVS_25_v2_cd) A-6
Table 58: Counties and Equivalent Areas (PVS_25_v2_county) A-8
Table 59:Minor Civil Divisions (PVS_25_v2_mcd) A-8
Table 60: Faces (PVS_25_v2_faces) A-9
Table 61: Water (PVS_25_v2_water) A-11
Table 62: Incorporated Place (PVS_25_v2_place) A-11
Table 63: State Legislative Districts (Upper/Senate) (PVS_25_v2_sldu) A-12
Table 64: State Legislative Districts (Lower/House) (PVS_25_v2_sldl) A-13
Table 65: American Indian/Alaska Native Areas- Legal (PVS_25_v2_aial) A-14
Table 66: School Districts - Elementary (PVS_25_v2_elsd) A-15
Table 67: School Districts- Secondary (PVS_25_v2_scsd) A-16
Table 68: School Districts- Unified (PVS_25_v2_unsd) A-17
Table 69: Census Block Groups (PVS_25_v2_bg) A-17
Table 70: Census Tracts- 2020 (PVS_25_v2_tracts2020) A-18
Table 71: Census Designated Places (PVS_25_v2_cdp) A-19
Table 72: Consolidated Cities (PVS_25_v2_concity) A-19
Table 73: Census County Divisions (PVS_25_v2_ccd) A-20
Table 74: Address Range Relationship Table (PVS_25_v2_addr) A-21
Table 75: Linear Feature Names- Fielded Relationship Table (PVS_25_v2_allnames) A-21
List of Figures
Figure 1: Suggested Workflow 3
Figure 2: Map Management Screen 13
Figure 3: Loading Partnership Shapefile Options 15
Figure 4: GUPS After Opening a Project 19
Figure 8: GUPS Data Settings Tool Button 25
Figure 9: GUPS Data Settings Tool Interface 26
Figure 10: Add Linear Feature Button 28
Figure 11: Delete/Restore Linear Feature Button 28
Figure 12: Modify Linear Feature Button 29
Figure 13: Split Linear Feature Button 29
Figure 14: Modify Area Feature Tool Button 30
Figure 15: Modify Area Feature Tool Interface 31
Figure 16: Add Area Button in the Modify Area Feature Tool 32
Figure 17: Remove Area Button in the Modify Area Feature Tool 33
Figure 18: Add Entity Button in the Modify Area Feature Tool 34
Figure 19: Delete Button in the Modify Area Feature Tool 35
Figure 20: Change Attribute Button in the Modify Area Feature Tool 35
Figure 21: Modify Area Feature Tool Displaying Incorporated Places 36
Figure 22: Add Area Button in the Modify Area Feature Tool 37
Figure 23: Legal Change Type Popup 37
Figure 24: Required Information for Legal Changes in the Create Change Polygons Dialog 37
Figure 25: Remove Area Button in the Modify Area Feature Tool 39
Figure 26: Legal Change Type Popup 39
Figure 27: Required Information for Legal Changes in the Create Change Polygons Dialog 39
Figure 28: Add Area Button in the Modify Area Feature Tool 41
Figure 29: Change Type Popup 41
Figure 30: Remove Area Button In the Modify Area Feature Tool 42
Figure 31: Boundary Change Type Popup 42
Figure 32: Add Entity Button in the Modify Area Feature Tool 43
Figure 33: Required Information for Legal Changes 43
Figure 34: Delete Button in the Modify Area Feature Tool 44
Figure 35: Verify Linear Feature Extension Button 46
Figure 36: Verify Linear Extension Interface 46
Figure 37: Feature Flagging Tool Button 53
Figure 38: Feature Flagging Tool Interface 53
Figure 39: Add Linear Feature Extension Button 55
Figure 40: Add Block Area Group Button 56
Figure 41: Delete Block Area Group Button 57
Figure 42: Review Block Boundary Tool Button 57
Figure 43: Review Block Boundary Tool Categories 57
Figure 44: Example of Reviewing Must Hold Flags in the Review Block Boundary Tool 58
Figure 45: Potential Small Block Check Button 59
Figure 46: Potential Small Block Check Interface 59
Figure 47: Review Change Polygons Button 60
Figure 48: Review Change Polygons Interface 61
Figure 49: Review Change Polygon Small Area Check Interface 61
Figure 50: Review Change Polygon Find Holes Interface 61
Figure 51: Geography Review Button 62
Figure 52: Geography Review Tool Interface 63
Figure 53: Geography Review Tool Results 63
Figure 54: Export to Zip Button 65
Figure 55: Share with Another Participant 65
Figure 56: Export for Census 66
Public Law (P.L.) 94-171 stipulates that the U.S. Census Bureau work in a non-partisan manner with the states to identify and provide the small-area population counts necessary for legislative redistricting. The Census Bureau is required to provide these counts within one year of Census Day, to the governor and the officers or public bodies responsible for redistricting in each state. For the 2030 Census, the Census Bureau must deliver the counts by April 1, 2031.
The Redistricting & Voting rights Data Office (RVDO) implements the requirements of P.L. 94-171 through the Redistricting Data Program (RDP) which is organized into five phases:
Phase 1: Block Boundary Suggestion Project (BBSP)
Phase 2: Voting District Project (VTDP)
Phase 3: Delivery of the 2030 Redistricting Data
Phase 4: Collection of Post-2030 Census Congressional and State Legislative District Plans
Phase 5: Review of the 2030 Census Redistricting Data Program and Recommendations for the 2040 Census
This document pertains to Phase 1: Block Boundary Suggestion Project (BBSP) of the RDP. Through the BBSP, nonpartisan liaisons designated by the governors and legislative leadership in each state, the District of Columbia, and the Commonwealth of Puerto Rico, can influence the delineation of the 2030 Census blocks (i.e., blocks).
Participants influence block delineation by suggesting linear features (e.g., roads, rivers, railroads, property lines, etc.) or edges to be held or not held as block boundaries. The Census Bureau refers to this as suggesting block boundaries, or setting or flagging “Must Hold” or “Do Not Hold” on the features. Participants can also influence block boundaries by adding and deleting linear features or edges, and by suggesting updates to boundaries for other census geographies including incorporated places, minor civil divisions (MCDs), counties, and area landmarks, all of which are potential block boundaries.
SECTION 1 of the document provides the conceptual overview of the planned 2030 Census block boundaries.
SECTION 2 of the document contains the suggested workflow, update activities, and quality control activities.
SECTION 3 of the document contains instructions for getting started with the GUPS Standalone software.
SECTION 4 of the document contains details on performing BBSP Update Activities.
SECTION 5 of the document contains the directions for submitting changes to the Census Bureau.
Block boundaries primarily follow visible features, such as roads and rivers, as well as any edges that bound legal, administrative, or statistical geographic areas or selected area landmarks stored in the Master Address File/Topologically Integrated Geographic Encoding and Referencing (MAF/TIGER) System (MTS). Census blocks nest within tabulated census geographic entities and are the smallest tabulation geography published by the decennial census.
Table 1 lists the feature and boundary types currently planned as 2030 Census block boundaries. If state participants flag these features as a “Do Not Hold” (i.e., request that the feature or boundary type not become a 2030 block boundary), the Census Bureau may not accept the “Do Not Hold” suggestion.
Table 1: 2030 Census Planned Block Boundaries by MAF/TIGER Feature Class Code (MTFCC)
MTFCC |
Description |
MTFCC |
Description |
G2120 |
Hawaiian Home Land |
G5200 |
Congressional District |
G2130 |
Alaska Native Village Statistical Area |
G5210 |
State Legislative District (Upper Chamber) |
G2140 |
Oklahoma Tribal Statistical Area |
G5220 |
State Legislative District (Lower Chamber) |
G2150 |
State-designated Tribal Statistical Area |
G5240 |
Voting District |
G2160 |
Tribal Designated Statistical Area |
G5400 |
Elementary School District |
G2170 |
American Indian Joint Use Area |
G5410 |
Secondary School District |
G2200 |
Alaska Native Regional Corporation |
G5420 |
Unified School District |
G2300 |
Tribal Subdivision |
G6330 |
Urban Growth Area |
G2400 |
Tribal Census Tract |
G6500 |
Military Installation |
G2410 |
Tribal Block Group |
K2181 |
National Park Service Land |
G4000 |
State or State Equivalent |
K2182 |
National Forest or Other Federal Land |
G4020 |
County or County Equivalent |
K2540 |
University or College |
G4040 |
County Subdivision |
K1235 |
Juvenile Institution |
G4060 |
Sub-Minor Civil Divisions |
K1236 |
Local Jail or Detention Center |
G4110 |
Incorporated Place |
K1237 |
Federal Penitentiary, State Prison, or Prison Farm |
G4120 |
Consolidated City |
K1238 |
Other Correctional Institution |
G5020 |
Census Tract |
S1100 |
Primary Road |
G5035 |
Block Area Grouping |
S1200 |
While primary and secondary roads (i.e., MTFCCs S1100 and S1200) are planned block boundaries, other linear features, such as local roads, alleys, railroads, and perennial water, may or may not qualify as block boundaries based on the established criteria. These features can be flagged as “Must Hold” or “Do Not Hold” block boundaries.
Participants can determine whether a feature is a planned block boundary by the feature’s value in the Census Block Boundary Flag (CBBFLG) field in the attribute table of the All Lines (edges) shapefile. A CBBFLG value of “4” indicates the feature is a planned 2030 block boundary, while a CBBFLG value of “9” indicates the feature is ineligible as a 2030 block boundary. When the CBBFLG field is null, its status has not yet been determined. This indicates that it is a good candidate for a “Must Hold” or a “Do Not Hold” flag.
Figure 1 depicts the suggested workflow for reviewing and updating Census Bureau data for the BBSP. This section outlines the activities associated with each of the workflow process boxes.
Work is performed at a county level and should be submitted to the Census Bureau on a flow basis, as each county is completed. Submitting work on flow basis permits the RVDO and the Census Bureau to review the files early in the process, provide feedback as necessary, and facilitates file processing.
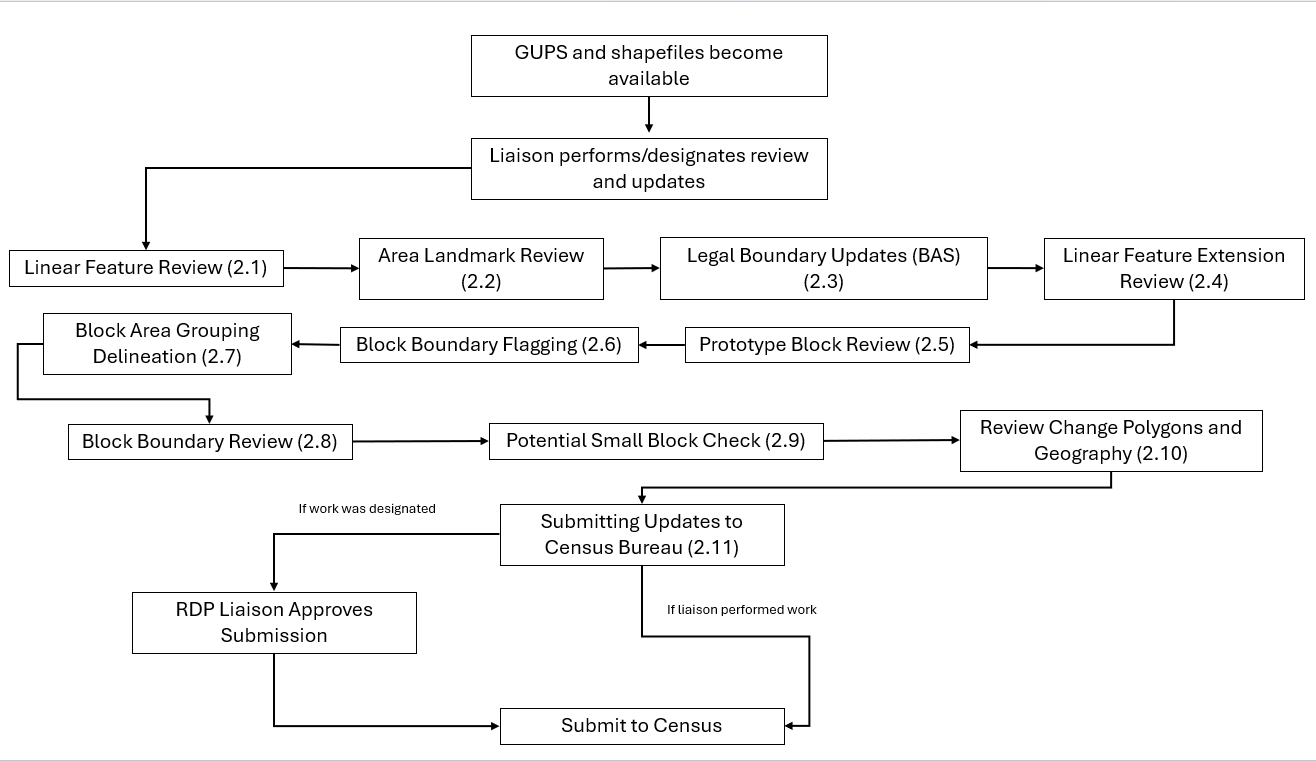
Note: The review process may be different for each state. The number in parentheses refers to the section where the action is described.
Review the Census Bureau’s linear features (edges shapefile) to determine whether there are features that need to be added or deleted. Pay particular attention to any areas that have experienced population growth, and where there may be new housing or subdivisions not reflected in the Census Bureau’s geospatial data.
Table 2: MTFCCs for Linear Feature Updates
MTFCC |
Description |
MTFCC |
Description |
C3024 |
Levee |
L4165 |
Ferry Crossing |
C3027 |
Dam |
P0001 |
Nonvisible Legal/Statistical Boundary |
H3010 |
Stream/River |
P0002 |
Perennial Shoreline |
H3013 |
Braided Stream |
P0003 |
Intermittent Shoreline |
H3020 |
Canal, Ditch, or Aqueduct |
P0004 |
Other non-visible bounding edge (e.g., Census water boundary, boundary of area feature) |
K2432 |
Pier/Dock |
S1100 |
Primary Road |
K2459 |
Runway/Taxiway |
S1200 |
Secondary Road |
L4010 |
Pipeline |
S1400 |
Local Neighborhood Road, Rural Road, City Street |
L4020 |
Power Line |
S1500 |
Vehicular Trail (4WD) |
L4110 |
Fence Line |
S1630 |
Ramp |
L4121 |
Ridge Line |
S1640 |
Service Drive usually along a limited access highway |
L4125 |
Cliff/Escarpment |
S1730 |
Alley |
L4130 |
Point-to-Point Line |
S1740 |
Private Road for service vehicles (logging, oil fields, ranches, etc.) |
L4140 |
Property/Parcel Line |
S1820 |
Bike Path or Trail |
R1011 |
Railroad Feature (Main, Spur, or Yard) |
R1051 |
Carline, Streetcar Track, Monorail, Other Mass Transit Rail |
R1052 |
Cog Rail Line, Incline Rail Line, Tram |
|
|
The basic groupings of the MTFCCs are as follows:
S-class = Roads.
R-class = Railroads.*
P-class = Nonvisible Features.*
L-class, K-class, and C-class = Other Linear Features.*
H-class = Hydrography.*
The Census Bureau will also accept attribute updates (name and classification code) for MTFCCs in the S-class (roads). Added road features (except for highway ramps) require a feature name.
*These types of linear features should only be added if desired as a block boundary and therefore must have a “Must Hold” flag assigned to them when submitted to the Census Bureau.
Note: Please be aware that the Census Bureau will not process the wholesale spatial realignment of features merely to conform to an alternate spatial accuracy. If a feature is in the incorrect location in the Census Bureau’s feature network, mark the feature for deletion and then add it in the correct location. Take this action only if most of the realigned feature is more than 7.6 meters from the existing feature or interferes (is topologically incorrect) with relationships to other features.
The Census Bureau accepts updates to area landmarks (e.g., prisons, state parks, and cemeteries) as part of the BBSP. Allowable updates include:
Boundary corrections (adding and removing area).
Creating a new area landmark.
Removing an area landmark.
Changing or adding a name to an area landmark.
Changing/updating the MTFCC of an area landmark.
If the state plans to reallocate prisoners during redistricting, consider reviewing the existing area landmarks with MTFCCs K1235, K1236, K1237, and K1238, which represent areas with prison populations, or create new ones for those types of areas.
To report updates to water area features, such as lakes or reservoirs, please contact the RVDO at 301-763-4039 or email <rdo@census.gov>.
Participants may provide legal boundary updates (annexations, deannexations, incorporations and disincorporations), along with their supporting documentation, or boundary corrections. The Census Bureau will assume the responsibility for reconciling the updates with the appropriate governments as part of the Boundary and Annexation Survey (BAS).
Participants may submit legal boundary updates for counties, MCDs, and incorporated places. Although legal documentation (effective date, authority type, and documentation number) is not required for boundary updates submitted through the BBSP, the Census Bureau strongly encourages the submission of documentation to expedite our ability to reconcile and process any legal updates reported. Annexations and deannexations without supporting documentation should be submitted as boundary corrections. To report a new county, MCD, or incorporated place or to delete an existing MCD or county, please call the RVDO at 301-763-4039, or email <rdo@census.gov>.
Note: The Census Bureau cannot guarantee these updates will be made, as we may first have to adjudicate and receive concurrence for the updates from the official BAS contact.
All block boundary suggestions are contingent upon the lines intersecting to form a closed polygon at the time the Census Bureau creates blocks. As a result, all block boundary “Must Hold” flags, when combined with the features identified as planned holds, should form a closed polygon.
For the 2020 Census, BBSP participants could place a “Must Hold” flag on an existing feature that did not form a closed a polygon. To do this, the participant also added a feature extension to close the polygon and create a potential new block. Those 2020 feature extensions are included in the 2030 BBSP files for review and update.
The Census Bureau requests that participants review the 2020 linear feature extensions to determine if they are still needed. Please be aware that to hold an old 2020 feature extension as a 2030 block boundary, participants must take an action to again classify that extension as a “Must Hold” flag.
During the linear feature extension review, participants may:
Hold the old 2020 linear feature extension as a 2030 block boundary suggestion along with the feature from which the extension originates. If possible, when applying a Must Hold to a feature extension, review the extension against cadastral data or imagery to ensure it is in the most appropriate location.
Flag the old 2020 feature extension as a "Do Not Hold" as some linear features cannot be deleted from the MTS. By flagging the old 2020 linear feature extensions as "Do Not Holds", will help the Census Bureau ensure the feature extension no longer serves as a block boundary.
Ignore the 2020 linear feature extension. Be aware that the Census Bureau may not use the 2020 feature extensions, and the features with which they are associated, as 2030 block boundaries. If no action is taken on a 2020 linear feature extension, the Census Bureau will decide whether to hold the extension and the feature associated with it as a 2030 block boundary or not.
The prototype block shapefile shows what the planned 2030 blocks would look like if created using the geography as it exists at this time. The prototype block shapefile is a useful tool for participants to review their potential block geography and then use the “Must Hold” and “Do Not Hold” flags to make targeted updates.
In the prototype block shapefile, the Census Bureau assigned a block size indicator (BLKZIND field) to each block based on the range of the estimated number of housing units in the prototype block. These values can be used to identify both potentially small population blocks or large population blocks to split or merge using the “Must Hold” and “Do Not Hold” flags.
Note: Although discrete numbers have been established to assign each block a size value, the actual number of housing units in a block is approximate.
Block size indicators range from “A” through “I”, with “A” blocks having the most housing units and “I” having the least. Prototype blocks estimated to contain no housing units are assigned an indicator letter of “Z.”
Table 3: Block Size Indicator Values
Indicator |
Approximate Number of Housing Units |
A |
Greater than 2,000 |
B |
1,600-1,999 |
C |
1,200-1,599 |
D |
1,000-1,199 |
E |
700-999 |
F |
480-699 |
G |
400-479 |
H |
240-399 |
I |
1-239 |
Z |
Potential “0” housing unit block |
In the prototype block shapefile, the Census Bureau also calculated a shape index (SHAPEIDX) using a simple area to perimeter ratio method. The shape index value will be between 0 and 1. The closer the value to 1, the more compact the block. The closer the value to 0 the less compact the block. These values can be used to help identify less compact blocks to see if their shape would interfere with the ability to conduct redistricting (e.g. long sinuous water bodies). Then, the “Must Hold” and “Do Not Hold” flags can be used to remedy this if it is an issue.
BBSP participants can assign BBSP flags to features, suggest they be held or not held as block boundaries in the BBSP_2030 field of the edges shapefile. Using established criteria for delineating tabulation blocks, the Census Bureau has identified features already planned as 2030 block boundaries, which have a CBBFLG value of “4” in the edges shapefile. Refer to Table 1 for the complete planned feature list. The planned block boundaries may change if the criteria change, or if a feature’s attributes are updated through other Census programs.
The Census Bureau has identified features that are ineligible to be 2030 block boundaries with a CBBFLG value of “9” in the edges shapefile. There are also features with no block boundary status assigned (CBBFLG value is null). Participants are not required to assign a BBSP flag (e.g., “Must Hold” or “Do Not Hold”) to every feature in the file, nor should they.
Table 4: Description of Block Boundary Flagging Fields
Values |
Description |
BBSPFLG=1 |
2020 Participant Identified “Must Hold” Block Boundary |
BBSPFLG=2 |
2020 Participant Identified” Do Not Hold” Block Boundary |
BBSPFLG=4 |
2020 Census Identified Planned Block Boundary |
BBSPFLG=9 |
2020 Census Identified Ineligible Block Boundary |
BBSP_2030=1 |
2030 Participant Identified “Must Hold” Block Boundary (Will be null until set by participant) |
BBSP_2030=2 |
2030 Participant Identified “Do Not Hold” Block Boundary (Will be null until set by participant) |
CBBFLG=1 |
2030 Participant Identified “Must Hold” Block Boundary (Populated by Census Bureau during processing of BBSP submission. Corresponds to value from the BBSP_2030 field.) |
CBBFLG=2 |
2030 Participant Identified “Do Not Hold” Block Boundary (Populated by Census Bureau during processing of BBSP submission. Corresponds to value from the BBSP_2030 field.) |
CBBFLG=4 |
2030 Census Identified Planned Block Boundary |
CBBFLG=9 |
2030 Census Identified Ineligible Block Boundary |
All BBSP participant-provided 2030 Census “Must Holds,” i.e., BBSP_2030 = 1, combined with existing features and other planned block boundaries, must form closed polygons.
2030 Census planned block boundaries, i.e., CBBFLG = 4, are an indication of what the Census Bureau plans to use as a 2030 Census block boundary if they were defined today. The planned block boundaries may change if the criteria changes, or if the feature attributes are updated through other Census programs.
BBSP participant provided 2030 Census “Do Not Holds”, i.e., BBSP_2030 = 2, will not be honored if the line they are placed on needs to be held for other purposes. For example, if a “Do Not Hold” flag was placed on an incorporated place boundary, the “Do Not Hold” flag would not be honored.
Participants may assign a “Must Hold” flag to features to suggest them as 2030 block boundaries. Candidates for assigning a “Must Hold” flag are:
Newly added features.
Features not currently planned as block boundaries.
To ensure features planned as 2030 block boundaries are held should the Census Bureau change their “planned” status.
Participants may wish to assign a “Must Hold” flag to features that are planned 2030 block boundaries in case the block definition criteria or feature classification codes change between when BBSP occurs and when the Census Bureau creates the 2030 Census blocks. Assigning a “Must Hold” flag to a planned block boundary feature will increase the likelihood that the feature will become a 2030 block boundary.
Be aware that assigning a “Must Hold” flag to a feature that is ineligible to be a block boundary or assigning a “Do Not Hold” flag to a feature that is planned to be a 2030 block boundary does not ensure that the Census Bureau will honor the request. The Census Bureau will re-evaluate the feature’s status based on the participant’s suggestion.
All “Must Hold” flags are contingent upon the features intersecting to form a closed polygon at the time the Census Bureau creates the 2030 blocks.
To hold a feature as a 2030 block boundary when the feature does not form a closed polygon, add a feature extension to close the polygon. Feature extensions must meet the following criteria:
Extensions, combined with other features and planned holds, must form a closed polygon.
Extensions must be no longer than 300 feet. (If an extension needs to be longer than 300 feet, participants must provide justification.)
Extensions must be a straight line originating from the end of a road feature.
Extensions must terminate on a non-road feature, except for highways (i.e., extensions may terminate on highways – MTFCC S1100).
Participants may assign “Do Not Hold” flags to features that they do not want to become 2030 block boundaries. Potential candidates for assigning a “Do Not Hold” flag may include:
Private roads, trails, and unimproved roads.
Hydrographic features with no area, shown as a single-line feature, such as streams or creeks.
Any feature creating unnecessary blocks, such as highway ramps, traffic circles, or cul-de-sacs shown as open circles or “lollipops” in the Census geospatial files, and similar features.
Be aware that assigning a “Do Not Hold” flag to a feature that is a 2030 planned block boundary may not be honored if that boundary is needed to meet other Census criteria or program needs. For example, if a “Do Not Hold” flag is placed on an incorporated place boundary, the “Do Not Hold” will not be honored.
During the 2030 Census block creation, the Census Bureau will automatically group islands to form a single block if they have no road features and the islands fall within a 5-kilometer radius. Participants may also choose to group specific islands to create a single 2030 Census block, called a Block Area Grouping (BAG). The criteria for creating a BAG are as follows:
BAG must consist of two or more islands.
BAG perimeter must be entirely over water.
BAGs cannot overlap.
BAGs cannot cross the boundary of other tabulation geographies, such as county or incorporated place boundaries.
BAG delineation is optional, and most appropriate for states with hydrographic areas that contain many islands.
Block boundary suggestions must be reviewed at least once before submitting updates to the Census Bureau. The Block Boundary Review Tool allows participants to systematically navigate to features on the map, by 2030 “Most Hold” and “Do Not Hold” flags, for review and further update if desired.
The Potential Small Block Check reviews the edges within the project and returns a list of potential small blocks that exist in the project based on the planned and suggested block boundaries.
All small blocks under 3,000 square meters are identified and listed. Within this list of potential small blocks:
Type “ - “: Small blocks under 3,000 square meters that are created by the planned block boundaries and do not include “Must Hold” flags.
Type A: Small blocks of 500 square meters or less that have one or more bounding edges where a "Must Hold" flag is involved.
Type B: Small blocks of 500.1 square meters to 3,000 square meters that have one or more bounding edges where a "Must Hold" flag is involved.
If the small blocks are unwanted or unintentional, they can be adjusted through Block Boundary Suggestion Flagging (i.e., remove the “Must Hold” flag from a bounding edge or apply a “Do Not Hold” flag). Potential small blocks must be reviewed at least once before submitting updates to the Census Bureau.
GUPS Standalone provides two general review tools, the Review Change Polygon and the Geography Review Tool, to review updated data layers.
The Review Change Polygon Tool contains two specific checks: Small Area Check and Find Holes. If there are changes to the boundary of the area landmark or legal entity, it is required to initiate and perform both checks at least once before the GUPS will allow the creation of a data output file.
The Small Area Check looks for changes that are less than 500 square feet. This is important to ensure that those changes are correct and not slivers.
The Find Holes check identifies any areas surrounded by an entity but not included in the entity, creating a “hole.”
These “holes” may be legitimate, but they may also be the result of delineation errors.
This check also provides the ability to make changes to legal boundary updates as the original updates and possible holes are being reviewed.
Note: The Small Area Check looks for small areas involved in BAS updates while the Potential Small Block Check looks for potential small blocks created by existing edges and block boundary suggestions.
The Geography Review Tool is optional and allows for the review of the contents of all layers in the project. When opened the tool will have a drop-down list of all the layers and the option to view the original layer and changes (if applicable) to the layer. There are filtering and navigation buttons contained within the tool. However, no updates can be made using the Geography Review Tool.
The Census Bureau conducts the RDP activities through the official liaison appointed by the governor and legislative leadership of the state. The official liaisons are responsible for making BBSP updates and submitting the projects to the Census Bureau. However, the official liaisons have two options for designating technical liaisons to assist them in making BBSP updates on behalf of the state.
Option 1. Official liaisons can formally designate technical liaisons who are able to perform geographic updates and submit completed updates to the Census Bureau on their behalf. Official liaisons should reach out to the RVDO at 301-763-4039 or <rdo@census.gov> to make technical liaison designations.
Option 2. Official liaisons can delegate work to designees who perform the updates and submit the updates back to the official liaison. The official liaison will submit the work to the Census Bureau if they approve the work. If the official liaison determines that BBSP work completed by a designee requires changes or additional work, it is the official liaison's responsibility to decide whether to make the changes or return the project to their designee for further updates.
The liaison responsible for submitting updates to the Census Bureau should submit completed, county-level files on a flow basis to the Census Bureau through the Secure Web Incoming Module (SWIM), for more information see SECTION 5. Do not hold files to submit all at once. Submit files as they are completed, especially at the beginning of the update period, so that the Census Bureau can provide feedback if there are errors, omissions, or other concerns.
GUPS is a user-friendly geographic information system (GIS) that is customized for each of the Census Bureau’s geographic partnership programs. GUPS features a BBSP module which offers tools specific to BBSP that allows participants to create a standardized submission. Standardized submissions allow the Census Bureau to easily process returned BBSP files and update the MTS.
A standalone version of GUPS is available for download from RVDO’s website at: https://www.census.gov/programs-surveys/decennial-census/about/rdo/program-management.html.
GUPS is based on QGIS, a free and open-source desktop GIS application. To learn more about QGIS, visit their website at <www.qgis.org>. The GUPS application was developed for use on a desktop PC. Before beginning the installation, confirm the computer has the capabilities needed to run GUPS. Table 5 lists the hardware and software requirements to install and run GUPS.
Table 5: System Requirements for GUPS
Hardware |
Operating System |
Disk Space Needed to Run GUPS: 4 GB Disk Space Needed to Store Shapefiles: Shapefile sizes vary. To view the size of the shapefiles, right-click, and choose Properties in the dropdown menu. The Files Properties box will open and display the folder size. Select multiple files/folders in the list to view their properties via the same method. RAM: 4 GB minimum, 8 GB or more recommended for optimal performance. |
Windows®: To run GUPS, Windows users need one of the following operating systems: • Windows 10® •Windows 11® Apple®: The use of Mac is not recommended for GUPS.
|
After downloading GUPS, follow the steps below to perform the installation.
Table 6: GUPS Installation Process
Step |
Description |
Step 1 |
Unzip the file “gups.zip” and extract all contents of the unzipped package to a folder on the computer. |
Step 2 |
Select the Setup-x.x.x batch file to start the installation. |
Step 3 |
When the installer opens, the Welcome to the QGIS GUPS Setup Wizard screen opens. Follow the instructions on the Wizard and select Next. |
Step 4 |
The License Agreement screen opens. Review the License Agreement and select I Agree to continue the install process. |
Step 5 |
The Choose Install Location screen opens. Select Browse to choose the location where GUPS will be installed. It is recommended to install the application at the default location shown (C:\Program Files\QGIS GUPS). Select Next to continue the install process. |
Step 6 |
The Choose Components screen opens. The Select Components to Install box will be grayed out as it is the default. Select Install to continue. |
Note: Many agencies/organizations require certain security privileges to download and install external software. Work with local Information Technology (IT) staff to acquire those privileges or ask they assist with GUPS installation. Please note that GUPS users with different security privileges than the IT staff person that installed the software will encounter problems accessing the directories and plugins needed to operate GUPS if the software is not installed under the user’s profile. To correct this, have the IT staff person reinstall GUPS under the user’s profile using the user’s credentials. If installation problems remain, contact us for installation assistance at 301-763-4039 or <rdo@census.gov>.
Figure 2 shows the GUPS Interface (with callouts noted in red, capital letters, to specific fields and functions) when opened after installation.
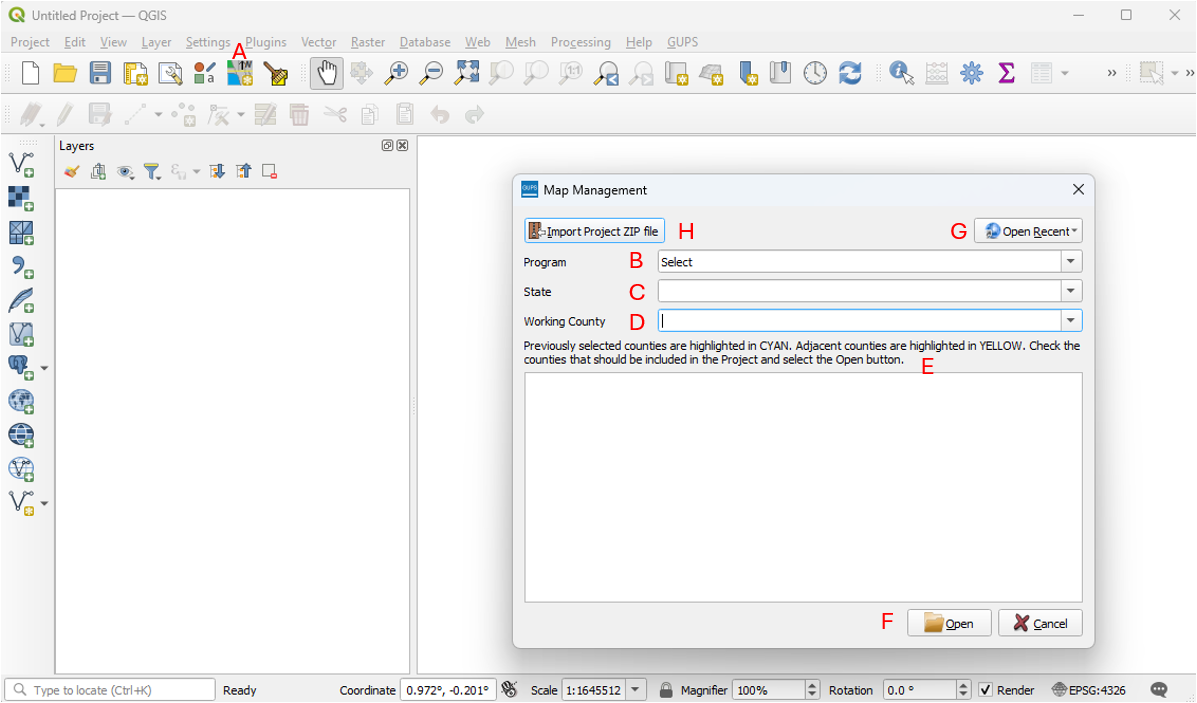
Figure 2: Map Management Screen
Table 7: Creating a New GUPS Project
Step |
Description |
Step 1 |
To set up a BBSP Project, use the Map Management tool. This tool should open automatically when opening QGIS. If it does not, select the button (A) that looks like a map with a north arrow. |
Step 2 |
Within the Map Management window, from the Program (B) drop down menu select Block Boundary Suggestion Project. |
Step 3 |
Complete the following selections:
|
Step 4 |
The Loading Partnership Shapefiles window will appear. Select the data (partnership shapefiles) source for the working county. The options to load current partnership shapefiles into the project include:
|
Step 5 |
After selecting the data source, the project will load. |
This section expands on the two options to load the current partnership shapefiles into the project after selecting the working county.
 Figure
3: Loading Partnership
Shapefile Options
Figure
3: Loading Partnership
Shapefile Options
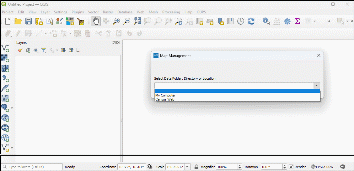
Partnership shapefiles can be loaded directly into the application from the Census Bureau’s website by choosing the Census Web option during project setup up. This is the recommended method for loading partnership shapefiles into GUPS as required files are automatically downloaded and placed in the correct location for GUPS to access.
Note: After downloading files via the Census Web option, do not manually change any shapefile name or folder location. The shapefiles and folders must have the exact given names and locations for the GUPS application to recognize them. GUPS gives the option to view the home directory or change where GUPS stores files on the computer in the GUPS Data Settings Tool. For more information refer to section 3.4.3.
For assistance with the Census Web download process, please call the RVDO at 301-763-4039, or email <rdo@census.gov>.
The information in this section is provided for use only in the rare event that the “Census Web” option is not available. With this option, the participant must first download the shapefiles from the Census Bureau’s partnership shapefile website or File Transfer Protocol (FTP) site. The participant will then select the “My Computer” option, navigate to the folder where the shapefiles are stored, and GUPS will load them into the project.
Note: The information in this section is provided as an efficient backup option, in the event a participant may need to obtain the partnership shapefiles from the Partnership Shapefiles website directly for use with the My Computer option to load the partnership shapefiles.
The first step is to create the folder to store the partnership shapefile data.
Table 8: Creating the My Computer Folder
Step |
Description |
Step 1 |
Create a folder for the shapefiles. There are no naming requirements for this folder. |
Step 2 |
Within the folder, create two subfolders, one subfolder named with the two-digit state level code (e.g. 42) which will contain the state level shapefiles, and one subfolder named with the five-digit state and county code combined (e.g. 42001). |
State level and county level partnership shapefiles are available from the Census Bureau’s FTP. The prototype block shapefiles are in a different directory than the partnership shapefiles, requiring a separate download. Refer to section 3.2.3.3. Download the Prototype Block Shapefiles from the FTP site.
There are two locations from where the partnership shapefiles can be downloaded.
Option 1: Download the partnership shapefiles from the Partnership Shapefiles website at: https://www.census.gov/geographies/mapping-files/time-series/geo/partnership.html. The Partnership shapefiles website allows for up to five counties or county equivalents to be downloaded at a time. The state level data is automatically included when at least one county is downloaded.
Option 2: Download the partnership shapefiles from the FTP site at: https://www2.census.gov/geo/pvs/ The FTP site allows for individual state and county data to be downloaded individually without an interface.
Both the Partnership Shapefiles website and FTP site package the data as a .zip file. These shapefiles reflect the legal boundaries of governments as reported through the 2025 BAS.
State Level: The .zip file is named: “partnership_shapefiles_25v2_<ss>, where ss represents the two-digit state code. When unzipped, the names of the shapefiles begin with the prefix “PVS_25_v2”. For example, the congressional district shapefile is named PVS_25_v2_cd_<ss>.
County Level: The .zip file is named: “partnership_shapefiles_ 25v2_<ssccc>,” where ss represents the two-digit state code and ccc represents the three-digit county code. When unzipped, the names of the shapefiles begin with the prefix “PVS_25_v2”. For example, the edges shapefile is named PVS_25_v2_edges_<ssccc>.
Note: The FTP site may contain different vintages of the partnership shapefiles. For BBSP, make sure to use vintage “v2” shapefiles that begin with the prefix PVS_25_v2.
Table 9: Downloading and Loading the Shapefiles for the My Computer Option
Step |
Description |
Step 1 |
Download the state level shapefiles to the state subfolder created in section 3.2.3.1. Do not unzip the file. |
Step 2 |
Download the county shapefiles to the county subfolder created in section 3.2.3.1 and unzip the file. |
Step 3 |
Open GUPS and open the Map Management screen to create the project. Figure 2 shows the Map Management screen. |
Step 4 |
On the Loading Partnership Shapefiles window, select My Computer. Figure 3 shows the Loading Partnership screen. |
Step 5 |
GUPS asks to the user to select a directory. |
Step 6 |
Navigate to the location where the files were saved and select the folder to be uploaded. GUPS loads the files, then moves them to a pre-established folder in the home directory. |
Note: Only one county file can be loaded by GUPS from this folder at a time. To create multiple projects, the counties must be added to the My Computer folder one at a time and then removed after they have been loaded. For example, if the My Computer folder has 42, 42001, and 42003 within the folder, it will not be able to load 42003. To load 42003, 42001 needs to be removed.
For participants utilizing the Census Web option, these shapefiles will automatically download and be added to the project.
Participants utilizing the My Computer option should download the prototype block shapefiles to use in conjunction with the partnership shapefiles. The prototype block shapefiles are downloaded in a .zip file and are created on an annual basis. Download the prototype block shapefiles from the FTP site at:
https://www2.census.gov/geo/pvs/bbsp/
The .zip file name for the BBSP prototype block shapefiles is “bbsp_2026_prototype_blocks_<st>" (where st represents the two-digit state code). When unzipped, the names of the shapefiles begin with the prefix bbsp_2026_block_<stccc> (two-digit state code and three-digit county code). There is a prototype block shapefile for every county within the state.
The FTP site may contain different vintages of the prototype block shapefiles. For BBSP, make sure to use the prototype block shapefiles that begin with “bbsp_2026.”
Note: Prototype block shapefiles should not be stored in the My Computer folder with the partnership shapefiles. They can be added using the Add Vector Data option described in section 3.4.2.3 once the project is created.
In the Map Management window shown in Figure 2, there are two options for opening an existing project.
Table 10: Opening an Existing GUPS Project
Step |
Description |
Step 1 |
Open GUPS and open the Map Management screen. Figure 2 shows the Map Management screen. |
Step 2 |
|
Step 3 |
The project opens and the map view defaults to the view when the project was last saved and displays any layer symbology changes made in the project. |
In the Map Management window shown in Figure 2, there is an option to open a BBSP submission using the Import Project ZIP option when that project was shared from another participant.
To open a file exported from GUPS using the Share with Participant Zip file option:
Table 11: Opening a Share with Participant Zip File
Step |
Description |
Step 1 |
Open GUPS and open the Map Management screen. Figure 2 shows the Map Management screen. |
Step 2 |
Select the Import a Project Zip File (H) button on the top left of the Map Management window. |
Step 3 |
A Windows Explorer window will open; navigate to and select the zipped Shared with Participant Zip File. |
Step 4 |
Once the file is selected, the interface will return to the Map Management window. |
Step 5 |
Click Open. |
Step 6 |
The project opens and the map view defaults to the view when the project was last saved and displays any layer symbology changes made in the project. |
Once the project is either created or opened, GUPS displays the following setup.
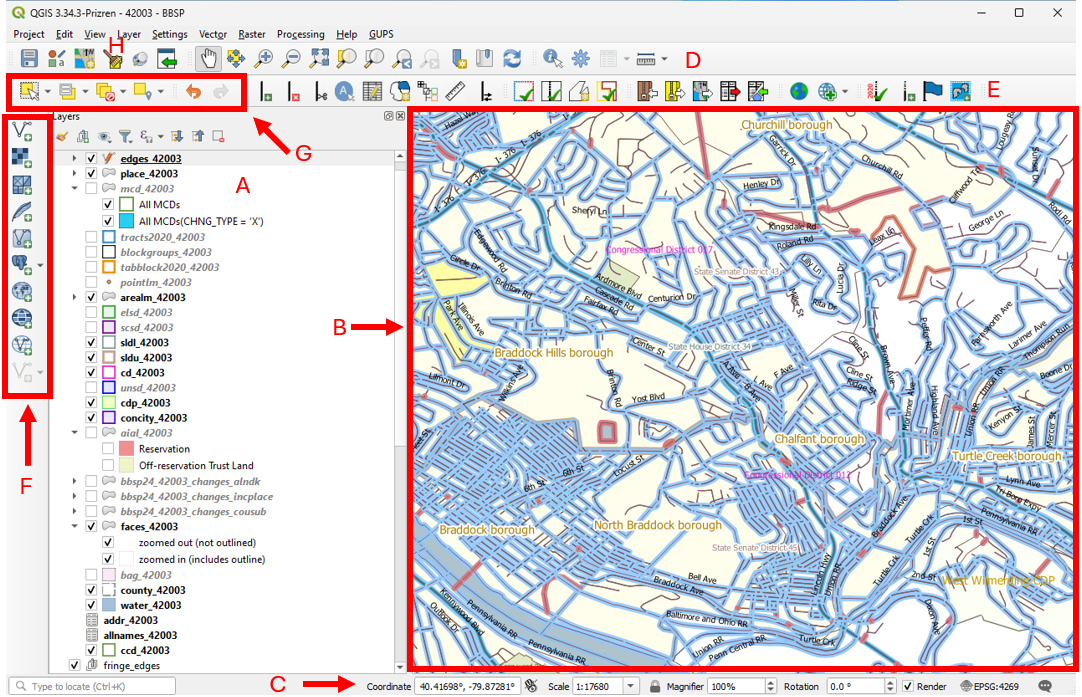
Figure 4: GUPS After Opening a Project
Layers Tab (A) shows all the layers in the project. The layers can be turned off and on and have the symbology adjusted in this panel.
Map View (B) shows the map view. The map view and layers tab are interdependent: changes made in the layers tab are reflected on the map.
Status Bar (C) displays the coordinates and scale of the map.
Standard Toolbar (D) provides tools to navigate the map and layers.
BBSP Toolbar (E) provides the BBSP functionality.
Add Data Toolbar (F) allows vector and raster data layers as well as other data types to be added to the project for reference.
Additional Tools for BBSP (G) are additional tools used during BBSP updates for selecting features and performing undo and redo actions.
GUPS Data Settings Tool (H) is a tool on the Standard Toolbar used for project management.
The Layers tab is the Table of Contents for the map and displays all the layers in the project. From this panel, participants can select the layer and view the attribute table, change the symbology, or change the order of the layers.
The Map View shows the map with all the layers and is where the participants will be making BBSP updates. The map and the Layers tab are interdependent; changes made in the table of contents are reflected on the map.
The Status Bar has several functions but the most important function for BBSP participants include the display of the coordinates and map scale.
There are several toolbars available in GUPS and are detailed in this Section.
The Standard Toolbar provides tools to navigate the map and layers.
![]()
Table 12: Standard Toolbar Description
BBSP Toolbar
The BBSP Toolbar contains specific tools for use in the BBSP.
![]()
Table 13: BBSP Toolbar Description
Tool |
Tool Icon |
Description |
Add Linear Feature |
|
Add a new linear feature; see section 4.1.1. |
Delete/Restore Linear Feature |
|
Delete a linear feature or restore a deleted feature; see section 4.1.2 and 4.1.3. |
Split Linear Feature |
|
Split a linear feature from one segment to two segments; see section 4.1.5. |
Display All Names |
|
Display all names for a street with multiple names assigned in the MAF/TIGER System. |
Modify Linear Feature Attribute |
|
Edit attributes of a selected linear feature; see section 4.1.4. |
Modify Area Feature |
|
Create and edit area landmarks and legal entities; see section 4.2.1. |
Show/Hide Legend |
|
Show or hide the layers tab. |
Scale Bar Tool |
|
Select the units of measurement to display on the scale (imperial or metric) and adjust the color of the scale bar. |
Switch Style |
|
Switch between the BBSP and Voting District (VTD) pre-defined symbology. Note: It is strongly suggested to use the BBSP pre-defined symbology. |
Review Block Boundary |
|
Perform a systematic review of linear features with block boundary suggestion flags sorted by BBSP category (Hold, Do Not Hold, NULL); see section 4.8. |
Geography Review Tool |
|
Review the attribute table by field values for all data layers; see section 4.10.2. |
Review Change Polygons |
|
Review the transaction polygons (for holes and minimum size) for area landmarks and legal geography updates and make corrections; see section 4.10.2. |
Criteria Review |
|
Run a criteria check on voting districts. This functionality is not applicable for BBSP updates. |
Import County Zip |
|
Import zipped GUPS project (Share with Participant option) shared by another GUPS user. |
Export to Zip |
|
Create the .zip file containing all required data and shapefiles for submission to the Census Bureau or to share with another GUPS user ; see section 4.11.1. |
Export Map to Print |
|
Export a printable map in .pdf, png, .tif, or .jpeg format. |
Export Shapefile/Tabular Equivalency File |
|
Export the congressional districts (CD), state legislative districts-upper (SLDU), and state legislative districts-lower (SLDL) layers as either a shapefile or tabular equivalency file. This functionality is not applicable for BBSP updates. |
Import Working File |
|
Import a shapefile, tabular equivalency files, or blank layer for CD, SLDU, and SLDL layers. This functionality is not applicable for BBSP updates. |
Internet Map Service |
|
Display the selected map location in an internet mapping service such as Google or Bing Maps. |
Add ESRI or Census Imagery |
|
Display satellite imagery overlaid on the QGIS map. |
2020 Feature Extension Review |
|
Perform a systematic review of 2020 linear feature extensions (if present) and take an action for 2030 (Assign a “Must Hold” flag or Ignore); see section 4.4. |
Add Feature Extension |
|
Add a 2030 linear feature extension to create a closed polygon for a suggested 2030 block; see section 4.6.5. |
Feature Flagging Tool (Hold/Do Not Hold) |
|
Assign or remove a “Must Hold” or “Do Not Hold” flag to a linear feature selected in the map window; see section 4.6. |
Add Block Area Grouping |
|
Create a Block Area Grouping over water; see section 4.7.1. |
Delete Block Area Grouping |
|
Delete a Block Area Grouping; see section 4.7.2. |
Potential Small Block Check |
|
Perform a systematic review of small blocks (less than 3,000 sq. meters) that exist in the project based on the planned and suggested block boundaries; see section 4.9. |
The Add Data Toolbar allows vector and raster data layers as well as other data types to be added to the project for reference.
![]()
Table 14: Add Data Toolbar Description
Tool |
Tool Icon |
Description |
Add Vector Layer |
|
Add vector-based shapefile and geodatabase files. |
Add Raster Layer |
|
Add raster-based shapefile and geodatabase files. |
Add Mesh |
|
Add Mesh Dataset. |
Add SpatialLite Layer |
|
Add data from a SpatialLite database. |
Add/Edit Virtual Layer |
|
Add or Edit Virtual Layers. |
Add PostGIS Layer |
|
Add PostGIS layer. |
Add WMS/WMST Layer |
|
Add Web Mapping Services (WMS) and Web Mapping Tile Services (WMTS). Publicly accessible and secured WMS services are supported. |
Add WCS Layer |
|
Add Web Coverage Services (WCS), which provide access to raster data useful for client-side map rendering. |
Add WFS Layer |
|
Add Web Feature Services. |
New Shapefile Layer |
|
Add a new shapefile layer or new temporary scratch layer. |

Table 15: Description of Other Important Tools
Tool |
Tool Icon |
Description |
Select Features by Area or Single Click |
|
Allows the user to select layer features in the map window with a single-click of the mouse, by dragging the cursor, or by drawing graphics on the screen. Options include Select Feature(s), Select Features by Polygon, Select Features by Freehand, or Select Features by Radius This tool is helpful when selecting multiple edges to apply “Must Hold” or “Do Not Hold” flags during the feature flagging process. |
Deselect Features from All Layers |
|
Deselect all features that are currently selected. |
Undo |
|
Undo the previous action. This tool is used when annexations and deannexations edits need to be canceled. |
Redo |
|
Redo the previous undo. |
This tool displays where the GUPS Home, Data Location, and Log Location are. This tool also allows the participant to delete projects, change where projects are saved (Change Folder Button), and open a window directly to the GUPS Directory Folder (Explorer Button).
![]()
Figure 8: GUPS Data Settings Tool Button
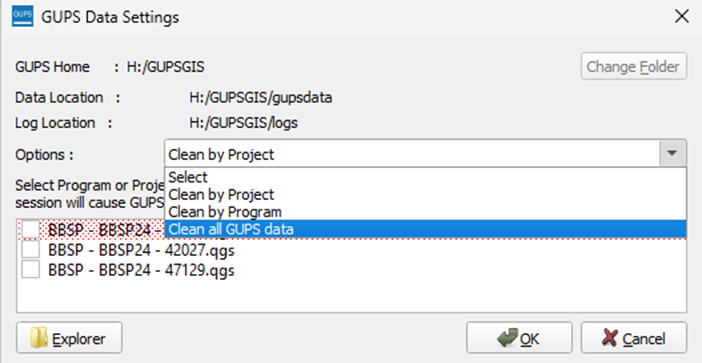
Figure 9: GUPS Data Settings Tool Interface
GUPS projects should always be deleted using the GUPS Data Settings Tool.
Table 16: Deleting Projects in GUPS
Step |
Description |
Step 1 |
Open the GUPS Data Settings Tool. Figure 8 shows this button. |
Step 2 |
To delete a project(s), select from the options menu:
Note: The active project in the current session is highlighted in red. Cleanups that include the current session will cause GUPS to shut down. This tool deletes files and folders permanently! |
Step 3 |
Click OK to delete the selected data or Cancel to cancel the delete process. |
Section 4 describes all the possible update activities in GUPS. Not all activities may apply to the participant’s projects.
Review the Census Bureau’s linear features (edges shapefile) to determine whether there are features that need to be added or deleted. Pay particular attention to any areas that have experienced population growth, and where there may be new housing or subdivisions not reflected in the Census Bureau’s geospatial data.
Refer to Table 2 for a complete list of MTFCCs for linear features.
The basic groupings of the MTFCCs are as follows:
S-class = Roads.
R-class = Railroads.*
P-class = Nonvisible Features.*
L-class, K-class, and C-class = Other Linear Features. *
H-class = Hydrography.*
The Census Bureau will also accept attribute updates (name and classification code) for MTFCCs in the S-class (roads). Added road features (except for highway ramps) require a feature name.
*These types of linear features should only be added if desired as a block boundary and therefore must have a “Must Hold” flag assigned to them when submitted to the Census Bureau.
Note: Please be aware that the Census Bureau will not process the wholesale spatial realignment of features merely to conform to an alternate spatial accuracy. If a feature is in the incorrect location in the Census Bureau’s feature network, mark the feature for deletion and then add it in the correct location. Take this action only if most of the realigned feature is more than 7.6 meters from the existing feature or interferes (is topologically incorrect) with relationships to other features.
![]()
Figure 10: Add Linear Feature Button
Table 17: How to Add a Linear Feature
Note: When adding new linear features, imagery should be used as a reference either by adding the imagery within GUPS using the various tools on the BBSP Toolbar or via the Add WMS tool on the Add Data Toolbar.
![]()
Figure 11: Delete/Restore Linear Feature Button
Table 18: How to Delete a Linear Feature
Step |
Description |
Step 1 |
Select the Delete/Restore Linear Feature button on the BBSP toolbar Figure 11 shows this button. |
Step 2 |
Select the linear feature to mark for deletion. A Delete/Restore Linear Feature dialog window will open with the message “Are you sure you want to delete the selected linear feature(s)?” |
Step 3 |
Confirm the action by selecting OK or select Cancel to cancel the delete. |
Step 4 |
If the linear feature existed in the shapefiles, the deleted line appears with a red dotted line symbology to show it has been marked for deletion. If the linear feature was newly added and then deleted, it is completely removed and cannot be restored. |
Table 19: How to Restore a Deleted Linear Feature
Step |
Description |
Step 1 |
Select the Delete/Restore Linear Feature button on the BBSP toolbar. Figure 11 shows this button. |
Step 2 |
Select the linear feature to restore. A Delete/Restore Linear Feature dialog window will open with the message “Restore Linear Feature?” |
Step 3 |
Confirm the action by selecting OK or select Cancel to cancel the restore. |
Step 4 |
The red dotted line symbology will be removed from the linear feature. |
![]()
Figure 12: Modify Linear Feature Button
Table 20: How to Modify a Linear Feature
Step |
Description |
Step 1 |
Select the Modify Linear Feature Attributes button on the BBSP toolbar. Figure 12 shows this button. |
Step 2 |
Select the linear feature to modify. A Modify Linear Feature Attributes dialog window will open. |
Step 3 |
Update the MTFCC and/or FULLNAME in the dialog window. Note: if the linear feature’s MTFCC is changed from a road to a non-road feature, the name is removed from the FULLNAME field. |
Step 4 |
Confirm the action by selecting Save or select Cancel to cancel the modification. |
![]()
Figure 13: Split Linear Feature Button
Table 21: How to Split a Linear Feature
Step |
Description |
Step 1 |
Select the Split Linear Feature button on the BBSP toolbar. Figure 13 shows this button. |
Step 2 |
Left click on the linear feature where the split should occur. Note: There is no confirmation message for the split. |
Step 3 |
The linear feature has been split. |
The Census Bureau accepts updates to area landmarks (such as prisons, state parks, and cemeteries) as part of the BBSP through the Modify Area Feature Tool. Allowable updates include:
Boundary corrections (adding and removing area).
Creating a new area landmark.
Removing an area landmark.
Changing or adding a name to an area landmark.
Changing/updating the MTFCC of an area landmark.
If the state plans to reallocate prisoners during redistricting, consider reviewing the existing area landmarks with MTFCCs K1235, K1236, K1237, and K1238, which represent areas with prison populations, or create new ones for those types of areas.
To report updates to water area features, such as lakes or reservoirs, please contact the RVDO at 301-763-4039 or email <rdo@census.gov>.
Figure 14 shows the Modify Area Feature Tool window and labels the various functions that the tool performs.
![]()
Figure 14: Modify Area Feature Tool Button
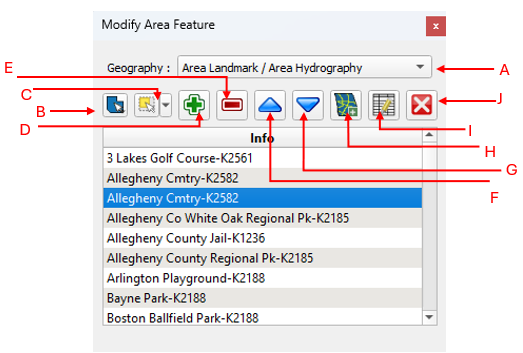
Figure 15: Modify Area Feature Tool Interface
Click the Modify Area Feature button on the BBSP toolbar. The Modify Area Feature dialog box opens.
Choose Geography (A) from the drop-down menu.
The info window populates with the list of geography types (e.g., area landmarks, legal entities, congressional, and state legislative districts) in the county. Once the geography type is selected, the Info window will populate with a list of all the entities in the county.
For BBSP, only Area Landmark/Area Hydrography, County, MCD, and Place updates will be accepted.
The following actions are available in the Modify Area Feature Tool:
Select Target Area (B) allows participant to select the geography directly from the map rather than from the list of geographies.
Select Features by Area or Single Click (C) allows the participant to select the method of how faces are selected:
Table 22: Select Features by Area or Single Click Options in Modify Area Feature Tool
-
Tool
Tool Icon
Description
Select Features

Allow a participant to either select a single face, select multiple faces by single clicking and holding the Shift or CTRL button, or drag and draw to select feature(s).
Select Features by Polygon

Allow a participant to draw a polygon around faces to select them.
Select Features by Freehand

Allow a participant to draw a freehand shape around faces to select them.
Select Features by Radius

Allow a participant to use select faces within a certain radius.
Select Features by Geography

Allow a participant to select a specific feature from the geographic type that is selected (i.e., Area Landmark/Area Hydrography). This is helpful if area landmarks are being merged.
Deselect All Features

Allow a participant to clear their selected faces.
Add Area (D) to add selected faces to target entity.
Remove Area (E) to remove selected faces from target entity.
Remove Area is not available for geographies that have wall to wall coverage within the county such as MCDs.
Previous (F) and Next (G) Record.
The blue arrows move up and down the list, highlighting the feature on the map as the feature is highlighted in the Info window.
Add Entity (H) to create a new area landmark or legal entity.
Change Attributes (I) to modify the attributes of the target entity.
Delete Area Feature (J) to delete an entity.
Delete is not available for geographies that have wall to wall coverage within the county such as MCDs.
![]()
Figure 16: Add Area Button in the Modify Area Feature Tool
Table 23: How to Add Area to an Area Landmark
Step |
Description |
Step 1 |
Click the Modify Area Feature button on the BBSP toolbar. Figure 14 shows this button. |
Step 2 |
Choose Area Landmark/Area Hydrography from the Geography drop-down menu. |
Step 3 |
Click on a row in the list to select the landmark to update. Double clicking the record zooms to the selected landmark. Alternatively, the Select Target Area option can be used to select the area landmark from the map. |
Step 4 |
Click on the Select Features by Area or Single Click button on the toolbar. |
Step 5 |
Click on the face(s) (polygons) on the map that should be added to the area landmark or choose another method for selecting faces from the drop-down menu to select the face(s) to add to the area landmark. To add more than one face, click on the first face, hold down the CRTL key, and click on the remaining faces to add. Because entities are comprised of faces, a face may need to be “split” for it to accurately reflect an entity’s boundary. To split a face, add a new linear feature (see section 4.1.1) that represents the boundary’s location and assign it the appropriate MTFCC. This “splits” the original face into two faces. Now select the face (polygon) for addition. |
Step 6 |
Select the Add Area button. Figure 16 shows this button. |
Step 7 |
GUPS will refresh with the area landmark’s new boundaries. |
![]()
Figure 17: Remove Area Button in the Modify Area Feature Tool
Table 24: How to Remove Area from an Area Landmark
Step |
Description |
Step 1 |
Click the Modify Area Feature button on the BBSP toolbar. Figure 14 shows this button. |
Step 2 |
Choose Area Landmark/Area Hydrography from the Geography drop-down menu. |
Step 3 |
Click on a row in the list to select the landmark to update. Double clicking the record zooms to the selected landmark. Alternatively, the Select Target Area option can be used to select the area landmark from the map. |
Step 4 |
Click on the Select Features by Area or Single Click button on the toolbar. |
Step 5 |
Click on the face(s) on the map that should be removed from the area landmark or choose another method for selecting faces from the drop-down menu to select the face(s) to remove from the area landmark. To remove more than one face, click on the first face, hold down the CRTL key, and click on the remaining faces to add. Because entities are comprised of faces (polygons), a face may need to be “split” for it to accurately reflect an entity’s boundary. To split a face, add a new linear feature (section 4.1.1) that represents the boundary’s location and assign it the appropriate MTFCC. This “splits” the original face into two faces. Now select the face (polygon) for removal. |
Step 6 |
Select the Remove Area button. Figure 17 shows this button. |
Step 7 |
GUPS will refresh with the area landmark’s new boundaries. |
New area landmarks can be created through the Modify Area Feature Tool to meet redistricting needs.
![]()
Figure 18: Add Entity Button in the Modify Area Feature Tool
Table 25: How to Create a New Area Landmark
Step |
Description |
Step 1 |
Click the Modify Area Feature button on the BBSP toolbar. Figure 14 shows this button. |
Step 2 |
Choose Area Landmark/Area Hydrography from the Geography drop-down menu. |
Step 3 |
The Info window populates with the list of area landmarks in the county. |
Step 4 |
Click on the face(s) on the map that should be included in the new area landmark or choose the method for selecting faces from the drop-down menu to select the face(s). To add more than one face, click on the first face, hold down the CRTL key, and click on the remaining faces to want to add. Because entities are comprised of faces (polygons), a face may need to be “split” for it to accurately reflect an entity’s boundary. To split a face, add a new linear feature (see section 4.1.1) that represents the boundary’s location and assign it the appropriate MTFCC. This “splits” the original face into two faces. Now select the face (polygon) for addition to the new entity. |
Step 5 |
Select the Add Entity button. Figure 18 shows this button. |
Step 6 |
The Add Entity Attributes dialog box opens. |
Step 7 |
The State and County code fields are pre-populated. |
Step 8 |
Enter the Full Name. |
Step 9 |
Select the MTFCC. |
Step 10 |
Click OK. |
![]()
Figure 19: Delete Button in the Modify Area Feature Tool
Table 26: How to Delete an Area Landmark
Step |
Description |
Step 1 |
Click the Modify Area Feature button on the BBSP toolbar. Figure 14 shows this button. |
Step 2 |
Choose Area Landmark/Area Hydrography from the Geography drop-down menu. |
Step 3 |
Click on a row in the list to select the landmark to delete. Double clicking on the record zooms to the selected landmark. Alternatively, the Select Target Area option can be used to select the area landmark from the map. |
Step 4 |
Click on the Delete Area Feature button. Figure 19 shows this button. Click Ok to save or Cancel to cancel. Once deleted, the area landmark is gray and is no longer in the list of area landmarks. |
![]()
Figure 20: Change Attribute Button in the Modify Area Feature Tool
Table 27: How to Modify an Area Landmark
Step |
Description |
Step 1 |
Click the Modify Area Feature button on the BBSP toolbar. Figure 14 shows this button. |
Step 2 |
Choose Area Landmark/Area Hydrography from the Geography drop-down menu. |
Step 3 |
Click on a row in the list to select the landmark to modify. Double clicking on the record zooms to the selected landmark. Alternatively, the Select Target Area option can be used to select the area landmark from the map. |
Step 4 |
Click on the Change Attributes button. Figure 20 shows this button. |
Step 5 |
Change the MTFCC to the appropriate MTFCC and/or change the name for the area landmark. |
Step 6 |
Click OK. |
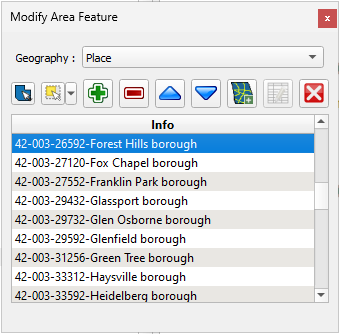
Figure 21: Modify Area Feature Tool Displaying Incorporated Places
Participants may provide legal boundary updates (annexations, deannexations, incorporations and disincorporations), along with their supporting documentation, or boundary corrections. The Census Bureau will assume the responsibility for reconciling the updates with the appropriate governments as part of the Boundary and Annexation Survey (BAS).
Participants may submit legal boundary updates for counties, MCDs, and incorporated places. Although legal documentation (effective date, authority type, and documentation number) is not required for boundary updates submitted through the BBSP, the Census Bureau strongly encourages the submission of documentation to expedite our ability to reconcile and process any legal updates reported. Annexations and deannexations without supporting documentation should be submitted as boundary corrections. To report a new county, MCD, or incorporated place or to delete an existing MCD or county, please call the RVDO at 301-763-4039, or email <rdo@census.gov>.
![]()
Figure 22: Add Area Button in the Modify Area Feature Tool
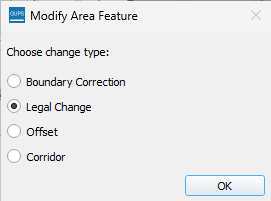
Figure 23: Legal Change Type Popup
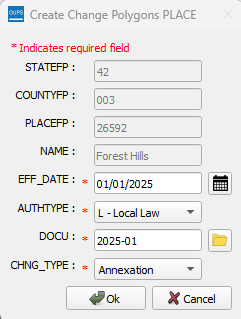
Figure 24: Required Information for Legal Changes in the Create Change Polygons Dialog
Table 28: How to Perform an Annexation
Step |
Description |
Step 1 |
Click the Modify Area Feature button on the BBSP toolbar. Figure 14 shows this button. |
Step 2 |
Choose the legal geography from the Geography drop-down menu. |
Step 3 |
Click on a row in the list to select the entity to update. Double clicking the record zooms to the selected entity. Alternatively, the Select Target Area option can be used to select the entity from the map. |
Step 4 |
Click on the Select Features by Area or Single Click button on the toolbar. |
Step 5 |
Click on the face(s) on the map that should be included in the new area landmark or choose the method for selecting faces from the drop-down menu to select the face(s). To add more than one face, click on the first face, hold down the CRTL key, and click on the remaining faces to want to add. Because entities are comprised of faces (polygons), a face may need to be “split” for it to accurately reflect an entity’s boundary. To split a face, add a new linear feature (see section 4.1.1) that represents the boundary’s location and assign it the appropriate MTFCC. This “splits” the original face into two faces. Now select the face (polygon) for the annexation. |
Step 6 |
Select the Add Area button. Figure 22 shows this button. |
Step 7 |
Select Legal Change. Figure 23 shows this popup. |
Step 8 |
Complete the required fields for the Create Change Polygons dialog window. Figure 24 shows this popup.
|
Step 9 |
Select OK. This will create a change in the changes file for the geography selected. |
Step 10 |
Selecting Cancel will save the change as a boundary correction and GUPS will refresh with the entity’s new boundaries. Use the Undo button (see Table 15) to reverse the boundary change. |
![]()
Figure 25: Remove Area Button in the Modify Area Feature Tool
Figure 26: Legal Change Type Popup
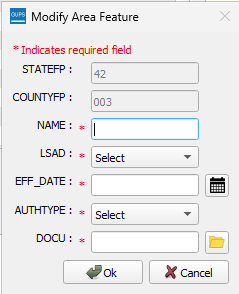
Figure 27: Required Information for Legal Changes in the Create Change Polygons Dialog
Table 29: How to Perform a De-Annexation
Step |
Description |
Step 1 |
Click the Modify Area Feature button on the BBSP toolbar. Figure 14 shows this button. |
Step 2 |
Choose the legal geography from the Geography drop-down menu. |
Step 3 |
Click on a row in the list to select the entity to update. Double clicking the record zooms to the selected entity. Alternatively, the Select Target Area option can be used to select the entity from the map. |
Step 4 |
Click on the Select Features by Area or Single Click button on the toolbar. |
Step 5 |
Click on the face(s) on the map that should be removed from the entity or choose the method for selecting faces from the drop-down menu to select the face(s) to remove from the entity. To remove more than one face, click on the first face, hold down the CRTL key, and click on the remaining faces to add. Because entities are comprised of faces (polygons), a face may need to be “split” for it to accurately reflect an entity’s boundary. To split a face, add a new linear feature (see section 4.1.1) that represents the boundary’s location and assign it the appropriate MTFCC. This “splits” the original face into two faces. Now select the face (polygon) for the deannexation. |
Step 6 |
Select the Remove Area button. Figure 25 shows this button. |
Step 7 |
Select Legal Change. Figure 26 shows this popup. |
Step 8 |
Complete the required fields for the Create Change Polygons dialog window. Figure 27 shows this popup.
|
Step 9 |
Select OK. This will create a change in the changes file for the geography selected. |
Step 10 |
Selecting Cancel will save the change as a boundary correction GUPS will refresh with the entity’s new boundaries. Use the Undo button (see Table 15) to reverse the boundary change. |
![]()
Figure 28: Add Area Button in the Modify Area Feature Tool
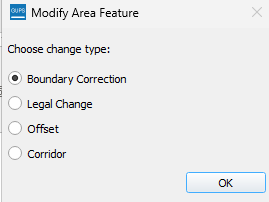
Table 30: How to Perform a Boundary Correction by Adding Area
Step |
Description |
Step 1 |
Click the Modify Area Feature button on the BBSP toolbar. Figure 14 shows this button. |
Step 2 |
Choose the legal geography from the Geography drop-down menu. |
Step 3 |
Click on a row in the list to select the entity to update. Double clicking the record zooms to the selected entity. Alternatively, the Select Target Area option can be used to select the entity from the map. |
Step 4 |
Click on the Select Features by Area or Single Click button on the toolbar. |
Step 5 |
Click on the face(s) on the map to add to the place or choose the method for selecting faces from the drop-down menu to select the face(s) to add to the entity. To add more than one face, click on the first face, hold down the CRTL key, and click on the remaining faces to add. Because entities are comprised of faces (polygons), a face may need to be “split” for it to accurately reflect an entity’s boundary. To split a face, add a new linear feature (see section 4.1.1) that represents the boundary’s location and assign it the appropriate MTFCC. This “splits” the original face into two faces. Now select the face (polygon) for addition. |
Step 6 |
Select the Add Area button. Figure 28 shows this button. |
Step 7 |
Select Boundary Correction. Figure 29 shows this popup. |
Step 8 |
GUPS will refresh with the entity’s new boundaries. |
![]()
Figure 30: Remove Area Button In the Modify Area Feature Tool
Figure 31: Boundary Change Type Popup
Table 31: How to Perform a Boundary Correction by Removing Area
Step |
Description |
Step 1 |
Click the Modify Area Feature button on the BBSP toolbar. Figure 14 shows this button. |
Step 2 |
Choose the legal geography from the Geography drop-down menu. Note: Participants cannot remove area from MCDs or counties. |
Step 3 |
Click on a row in the list to select the entity to update. Double clicking the record zooms to the selected entity. Alternatively, the Select Target Area option can be used to select the entity from the map. |
Step 4 |
Click on the Select Features by Area or Single Click button on the toolbar. |
Step 5 |
Click on the face(s) on the map that should be removed from the place or choose the method for selecting faces from the drop-down menu to select the face(s) to from the entity. To remove more than one face, click on the first face, hold down the CRTL key, and click on the remaining faces to remove. Because entities are comprised of faces (polygons), a face may need to be “split” for it to accurately reflect an entity’s boundary. To split a face, add a new linear feature (see section 4.1.1) that represents the boundary’s location and assign it the appropriate MTFCC. This “splits” the original face into two faces. Now select the face (polygon) for removal. |
Step 6 |
Select the Remove Area button. Figure 30 shows this button. |
Step 7 |
Select Boundary Correction. Figure 31 shows this popup. |
Step 8 |
GUPS will refresh with the entity’s new boundaries. |
![]()
Figure 32: Add Entity Button in the Modify Area Feature Tool
Figure 33: Required Information for Legal Changes
Table 32: How to Add a New Legal Entity
Step |
Description |
Step 1 |
Click the Modify Area Feature button on the BBSP toolbar. Figure 14 shows this button. |
Step 2 |
Choose the legal geography from the Geography drop-down menu. |
Step 3 |
Click on the Select Features by Area or Single Click button on the toolbar. |
Step 4 |
Click on the face(s) on the map that should be used to create the new entity or choose the method for selecting faces from the drop-down menu to select the face(s). To add more than one face, click on the first face, hold down the CRTL key, and click on the remaining faces to add. Because entities are comprised of faces (polygons), a face may need to be “split” for it to accurately reflect an entity’s boundary. To split a face, add a new linear feature (see section 4.1.1) that represents the boundary’s location and assign it the appropriate MTFCC. This “splits” the original face into two faces. Now select the face (polygon) for the new legal entity. |
Step 5 |
The Add Entity Attributes dialog box opens. Figure 33 shows this popup. In the dialog window, complete the following fields:
|
Step 6 |
Click OK. |
![]()
Figure 34: Delete Button in the Modify Area Feature Tool
Table 33: How to Delete a Legal Entity
Step |
Description |
Step 1 |
Click the Modify Area Feature button on the BBSP toolbar. Figure 14 shows this button. |
Step 2 |
Choose the legal geography from the Geography drop-down menu. |
Step 3 |
Select the entity either from the list or by using the Select Target Area. Note: Participants cannot delete MCDs or the county. |
Step 4 |
Click the Delete Area Feature Tool. Figure 34 shows this button. |
Step 5 |
A dialog window asks, “Are you sure you want to delete this area feature? |
Step 6 |
Select OK. The disincorporated government turns gray on the map (color may vary) and is removed from the list of incorporated places in the county. |
Note: If the deleted government crosses a county boundary, it must be deleted in both counties separately. After making the change in the working county, return to Map Management, select the other county as the working county, and proceed to delete the government in this county as well. If the deleted government crosses more than one county boundary, complete the deletion in each county affected
All block boundary suggestions are contingent upon the lines intersecting to form a closed polygon at the time the Census Bureau creates blocks. As a result, all block boundary “Must Hold” suggestions, when combined with the features identified as planned holds, should form a closed polygon.
For the 2020 Census, BBSP participants could place a “Must Hold” flag on an existing feature that did not form a closed polygon. To do this, the participant also added a feature extension to close the polygon and create a potential new block. Those 2020 feature extensions are included in the 2030 BBSP files for review and update.
The Census Bureau requests that participants review the 2020 linear feature extensions to determine if they are still needed. Please be aware that to hold an old 2020 feature extension as a 2030 block boundary, participants must take an action to again classify that extension as a “Must Hold” suggestion.
During the feature extension review, participants may:
Hold the old 2020 linear feature extension as a 2030 block boundary suggestion along with the feature from which the extension originates. If possible, when applying a Must Hold to a feature extension, review the extension against cadastral data or imagery to ensure it is in the most appropriate location.
Flag the old 2020 feature extension as a "Do Not Hold" as some linear features cannot be deleted from the MTS. Flagging the old 2020 linear feature extension as a "Do Not Hold," will help the Census Bureau ensure the feature extension no longer serves as a block boundary.
Ignore the 2020 linear feature extension. Be aware that the Census Bureau may not use the 2020 feature extensions, and the features with which they are associated, as 2030 block boundaries. If no action is taken on a 2020 linear feature extension, the Census Bureau may delete the old extension or if kept, decide whether to hold the extension and the feature associated with it as a 2030 block boundary or not.
The 2020 Linear Feature Extension Tool allows the streamlined review of previously flagged linear feature extensions.
Note: Not all counties have 2020 linear feature extensions to review.
![]()
Figure 35: Verify Linear Feature Extension Button
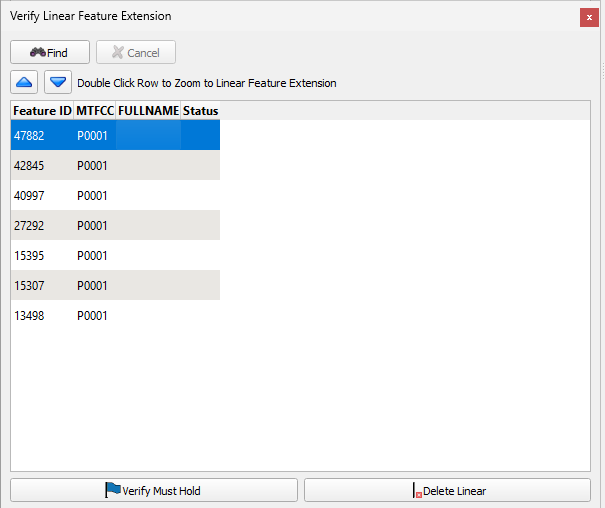
Figure 36: Verify Linear Extension Interface
Table 34: How to Review 2020 Linear Feature Extensions
Step |
Description |
Step 1 |
Click the 2020 Feature Extension Review button on the BBSP toolbar. Figure 35 shows this button. |
Step 2 |
Click Find. |
Step 3 |
The search results will populate with 2020 Linear Feature Extensions in the county. If there are no extensions in the county, the list will be empty, and a message will appear stating that there are no linear feature extensions in the county. Click the OK button. |
Step 4 |
For counties with linear feature extensions, shown in Figure 36, click through the records and choose an action below for each record. |
Table 35: How to Assign a "Must Hold" flag to a 2020 Linear Feature Extension
Step |
Description |
Step 1 |
Click the 2020 Feature Extension Review button on the BBSP toolbar. Figure 35 shows this button. |
Step 2 |
Click Find. |
Step 3 |
The search results will populate with 2020 Linear Feature Extensions in the county. . |
Step 4 |
Select the record and click the Verify Must Hold button to assign the “Must Hold” flag. Figure 36 shows this button. |
As many linear features cannot be deleted from the MTS, it is recommended that if there are linear feature extensions that appear in the review that should be deleted, use the Feature Flagging Tool to assign “Do Not Hold” flags to these extensions, see section 4.6.3 and disregard the Delete Linear button.
If the linear feature extension should be ignored, take no action in the Verify Linear Feature Extension tool.
The prototype block shapefile shows what the planned 2030 blocks would look like if created using the geography as it exists at this time. The prototype block shapefile is a useful tool for participants to review their potential block geography and then use the “Must Hold” and “Do Not Hold” flags to make targeted updates.
Note: If the participant used the “My Computer” option to create the county project, prototype block shapefiles will need to be manually added using the Add Vector Layer tool in the Add Data Toolbar, refer to section 3.4.2.3.
In the prototype block shapefile, the Census Bureau assigned a block size indicator (BLKZIND field) to each block based on the range of the estimated number of housing units in the prototype block. These values can be used to identify both potentially small population blocks or large population blocks to split or merge using the “Must Hold” and “Do Not Hold” flags.
Note: Although discrete numbers have been established to assign each block a size value, the actual number of housing units in a block is approximate.
Block size indicators range from “A” through “I,” with “A” blocks having the most housing units and “I” having the least. Prototype blocks estimated to contain no housing units are assigned an indicator letter of “Z.”
Table 36: Block Size Indicator Values
Indicator |
Approximate Number of Housing Units |
A |
Greater than 2,000 |
B |
1,600-1,999 |
C |
1,200-1,599 |
D |
1,000-1,199 |
E |
700-999 |
F |
480-699 |
G |
400-479 |
H |
240-399 |
I |
1-239 |
Z |
Potential “0” housing unit block |
In the prototype block shapefile, the Census Bureau also calculated a shape index (SHAPEIDX) using a simple area to perimeter ratio method. The shape index value will be between 0 and 1. The closer the value to 1, the more compact the block. The closer the value to 0 the less compact the block. These values can be used to help identify less compact blocks to see if their shape would interfere with the ability to conduct redistricting (e.g. long sinuous water bodies). Then, the “Must Hold” and “Do Not Hold” flags can be used to remedy this if it is an issue.
BBSP participants can assign BBSP flags to features, suggest they be held or not held as block boundaries in the BBSP_2030 field of the edges shapefile. Using established criteria for delineating tabulation blocks, the Census Bureau has identified features already planned as 2030 block boundaries, which have a CBBFLG value of “4” in the edges shapefile. Refer to Table 1 for the complete planned feature list. The planned block boundaries may change if the criteria change, or if a feature’s attributes are updated through other Census programs.
The Census Bureau has also identified features that are ineligible to be 2030 block boundaries with a CBBFLG value of “9” in the edges shapefile. There are also features with no block boundary status assigned (CBBFLG value is null). Participants are not required to assign a BBSP flag (e.g., “Must Hold” or “Do Not Hold”) to every feature in the file, nor should they.
Table 37: Description of Block Boundary Flagging Fields
Values |
Description |
BBSPFLG=1 |
2020 Participant Identified “Must Hold” Block Boundary. |
BBSPFLG=2 |
2020 Participant Identified “Do Not Hold” Block Boundary. |
BBSPFLG=4 |
2020 Census Identified Planned Block Boundary. |
BBSPFLG=9 |
2020 Census Identified Ineligible Block Boundary. |
BBSP_2030=1 |
2030 Participant Identified “Must Hold” Block Boundary (Will be null until set by participant). |
BBSP_2030=2 |
2030 Participant Identified “Do Not Hold” Block Boundary (Will be null until set by participant). |
CBBFLG=1 |
2030 Participant Identified “Must Hold” Block Boundary (Populated by Census Bureau during processing of BBSP submission. Corresponds to value from the BBSP_2030 field). |
CBBFLG=2 |
2030 Participant Identified” Do Not Hold” Block Boundary (Populated by Census Bureau during processing of BBSP submission. Corresponds to value from the BBSP_2030 field). |
CBBFLG=4 |
2030 Census Identified Planned Block Boundary. |
CBBFLG=9 |
2030 Census Identified Ineligible Block Boundary. |
All BBSP participant-provided 2030 Census “Must Holds,” i.e., BBSP_2030 = 1, combined with existing features and other planned block boundaries, must form closed polygons.
2030 Census planned block boundaries, i.e., CBBFLG = 4, are an indication of what the Census Bureau plans to use as a 2030 Census block boundary if they were defined today. The planned block boundaries may change if the criteria changes, or if the feature attributes are updated through other Census programs.
BBSP participant provided 2030 Census “Do Not Hold” flag(s), i.e., BBSP_2030 = 2, will not be honored if the line they are placed on needs to be held for other purposes. For example, if a “Do Not Hold” flag was placed on an incorporated place boundary, the “Do Not Hold” flag would not be honored.
Table 38: Block Boundary Flagging Symbology
Value |
Symbology |
Description |
Planned Block Boundaries CBBFLG=4 |
|
Edges that are planned block boundaries have a blue halo symbology. |
Ineligible Block Boundaries CBBFLG=9 |
|
Edges that are ineligible block boundaries have a red halo symbology. |
“Must Hold” BBSP_2030=1 |
|
Edges that are flagged as a “Must Hold” that are neither planned nor ineligible block boundaries have a dark blue dotted line. |
“Do Not Hold” BBSP_2030=2 |
|
Edges that are flagged as a “Do Not Hold” that are neither planned nor ineligible block boundaries have a dark red dotted line. |
“Must Hold” on a Planned Block Boundary CBBFLG=4 BBSP_2030=1 |
|
Edges that are planned block boundaries and have been flagged as a “Must Hold” have the dark blue dotted line on top of the blue halo symbology. |
“Do Not Hold“ on a Planned Block Boundary CBBFLG=4 BBSP_2030=2 |
|
Edges that are planned block boundaries and have been flagged as a “Do Not Hold” have the dark red dotted line on top of the blue halo symbology. |
“Must Hold” on an Ineligible Block Boundary CBBFLG=9 BBSP_2030=1 |
|
Edges that are ineligible block boundaries and have been flagged as a “Must Hold” have the dark blue dotted line on top of the red halo symbology. |
“Do Not Hold” on an Ineligible Block Boundary CBBFLG=9 BBSP_2030=2 |
|
Edges that are ineligible block boundaries and have been flagged as a “Do Not Hold” have the dark red dotted line on top of the red halo symbology. |
NULL |
|
Edges that have no block boundary flags are a single straight line. The color may vary between roads (dark brown) and hydro features (blue). |
CD/SLD Block Split CBBFLG=S |
|
For Reference Only: Edges that have been flagged as a CD/SLD Block Split have a green/gray halo symbology. |


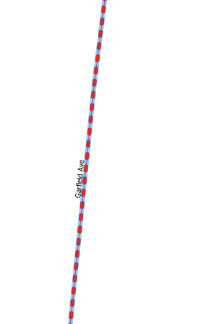


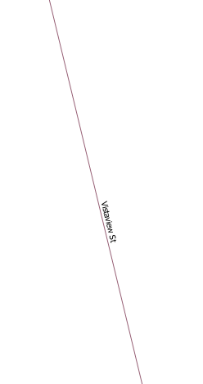

Participants may assign a “Must Hold” flag to features to suggest them as 2030 block boundaries. Candidates for assigning a “Must Hold” flag are:
Newly added features.
Features not currently planned as block boundaries.
To ensure features planned as 2030 block boundaries are held should the Census Bureau change their “planned” status.
Participants may wish to assign a “Must Hold” flag to features that are planned 2030 block boundaries in case the block definition criteria or feature classification codes change between when BBSP occurs and when the Census Bureau creates the 2030 Census blocks. Assigning a “Must Hold” to a planned block boundary feature will increase the likelihood that the feature will become a 2030 block boundary.
Be aware that assigning a “Must Hold” flag to a feature that is ineligible to be a block boundary or assigning a “Do Not Hold” flag to a feature that is planned to be a 2030 block boundary does not ensure that the Census Bureau will honor the request. The Census Bureau will re-evaluate the feature’s status based on the participant’s suggestion.
All “Must Hold” block boundary suggestions are contingent upon the features intersecting to form a closed polygon at the time the Census Bureau creates the 2030 blocks.
To hold a feature as a 2030 block boundary when the feature does not form a closed polygon, add a feature extension to close the polygon. Feature extensions must meet the following criteria:
Extensions, combined with other features and planned holds, must form a closed polygon.
Extensions must be no longer than 300 feet. (If an extension needs to be longer than 300 feet, participants must provide justification.)
Extensions must be a straight line originating from the end of a road feature.
Extensions must terminate on a non-road feature, except for highways (i.e., extensions may terminate on highways – MTFCC S1100).
![]()
Figure 37: Feature Flagging Tool Button
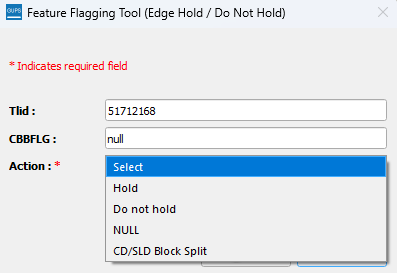
Figure 38: Feature Flagging Tool Interface
Table 39: How to Assign a “Must Hold” Flag
Step |
Description |
Step 1 |
Zoom to the area of interest on the map. If selecting multiple features to assign “Must Hold” flags to using the selection tools describes in Table 15, select the features before going to Step 2. |
Step 2 |
Click the Feature Flagging Tool button. Figure 37 shows this button. |
Step 3 |
If multiple features were not selected in Step 1, select a feature in the map view by clicking on it. The Feature Flagging Tool (Edge Hold/Do Not Hold) dialog opens displaying the TIGER Line ID (TLID) and the current CBBFLG status: Planned, Ineligible, Split, or Null. Figure 38 shows the interface. |
Step 4 |
Select Hold as the action. If a “Must Hold” is assigned to an ineligible 2030 block boundary (CBBFLG=9), a warning message appears that the Census Bureau cannot guarantee that the edge will be held as a 2030 block boundary and will ask to enter a justification statement. The justification statement is optional. |
Step 5 |
The” Must Hold” flag is applied and represented by a dotted blue line. |
Note: If the participant is performing boundary corrections, annexations, or deannexations to legal entities, do not flag the new boundaries with a “Must Hold” flag. The BAS team may adjudicate the updates with the BAS contact and apply the updates in a different manner than how they were submitted. However, the new legal boundaries will automatically be held as 2030 block boundaries.
Participants may assign “Do Not Hold” flags to features that they do not want to become 2030 block boundaries. Potential candidates for assigning a “Do Not Hold” flag may include:
Private roads, trails, and unimproved roads.
Hydrographic features with no area, shown as a single-line feature, such as streams or creeks.
Any feature creating unnecessary blocks, such as highway ramps, traffic circles, or cul-de-sacs shown as open circles or “lollipops” in the Census geospatial files, and similar features.
Be aware that assigning a “Do Not Hold” flag to a feature that is a 2030 planned block boundary may not be honored if that boundary is needed to meet other Census criteria or program needs. For example, if a “Do Not Hold” flag is placed on an incorporated place boundary, the “Do Not Hold” will not be honored.
Table 40: How to Assign a “Do Not Hold” Flag
Step |
Description |
Step 1 |
Zoom to the area of interest on the map. If selecting multiple features to assign “Do Not Hold” flags to using the selection tools describes in Table 15, select the features before going to Step 2. |
Step 2 |
Click the Feature Flagging Tool button. Figure 37 shows this button. |
Step 3 |
If multiple features were not selected in Step 1, select a feature in the map view by clicking on it. The Feature Flagging Tool (Edge Hold/Do Not Hold) dialog opens displaying the TIGER Line ID (TLID) and the current CBBFLG status: Planned, Ineligible, Split, or Null. Figure 38 shows the interface. |
Step 4 |
Select Do Not Hold as the action. If the edge is a planned block boundary, a warning message appears stating that this line is a planned 2030 block boundary and that the request will be reviewed but cannot guarantee that the line will not be held. |
Step 5 |
The” Do Not Hold” flag is applied and represented by a dotted red line. |
Note: If the participant is performing boundary corrections, annexations, or deannexations to legal entities, do not flag the previous boundaries with “Do Not Hold” flags. The BAS team may adjudicate the updates with the BAS contact and apply the updates in a different manner than how they were submitted.
Table 41: How to Remove a Flag
Step |
Description |
Step 1 |
Zoom to the area of interest on the map. If selecting multiple features to remove “Must Hold” and “Do Not Hold” flags to using the selection tools describes in Table 15, select the features before going to Step 2. |
Step 2 |
Click the Feature Flagging Tool button. Figure 37 shows this button. |
Step 3 |
If multiple features were not selected in Step 1, select a feature in the map view by clicking on it. The Feature Flagging Tool (Edge Hold/Do Not Hold) dialog opens displaying the TIGER Line ID (TLID) and the current CBBFLG status: Planned, Ineligible, Split, or Null. Figure 38 shows the interface. |
Step 4 |
Select NULL as the action. |
Step 5 |
The “Must Hold” or “Do Not Hold” flag(s) are removed, and the original symbology is restored. |
Note: Figure 38 shows CD/SLD Split as an option for in the Feature Flagging Tool. This should only be applied when creating block splits during Phase 4 Collection of Post-2020 Census Congressional and State Legislative District Plans and is not part of the BBSP update process.
![]()
Figure 39: Add Linear Feature Extension Button
Table 42: How to Digitize a New Linear Feature Extension
Step |
Description |
Step 1 |
Zoom to the area of interest on the map. |
Step 2 |
Select the Add Linear Feature Extension button on the BBSP Toolbar. Figure 39 shows this button. |
Step 3 |
A message outlining the criteria for a linear feature extension is displayed. The criteria include
|
Step 4 |
Digitize the linear feature extension by clicking the mouse at the end point of the feature then left clicking the point where the extension will intersect another feature. |
Step 5 |
The Add Extension dialog opens displaying the length of the feature extension. If a linear feature extension is added and is longer than 300 feet, a prompt will ask for a justification to be entered. Once entered, click on Save to complete the extension or Cancel to delete the extension. |
Step 6 |
The extension has a “Must Hold” flag automatically applied to the extension and the road it is extending. |
During the 2030 Census block creation, the Census Bureau will automatically group islands to form a single block if they have no road features and the islands fall within a 5-kilometer radius. Participants may also choose to group specific islands to create a single 2030 Census block, called a Block Area Grouping (BAG). The criteria for creating a BAG are as follows:
BAG must consist of two or more islands.
BAG perimeter must be entirely over water.
BAGs cannot overlap.
BAGs cannot cross the boundary of other geographies, such as county or incorporated place boundaries.
BAG delineation is optional, and most appropriate for states with hydrographic areas that contain many islands.
![]()
Figure 40: Add Block Area Group Button
Table 43: How to Create a Block Area Grouping
Step |
Description |
Step 1 |
Zoom to the area of interest on the map. |
Step 2 |
Select the Add Block Area Grouping button on the toolbar. Figure 40 shows this button. |
Step 3 |
Digitize the BAG polygon by clicking the left mouse button to begin drawing the BAG and continue to left click at each vertex (shape) point of the line. |
Step 4 |
Click the left mouse to on the starting point of the BAG to close the BAG polygon. |
Step 5 |
The BAG confirmation dialog box opens. |
Step 6 |
Click OK to save the BAG. |
Step 7 |
Click Cancel if to discard the BAG or to draw a different BAG boundary. |
![]()
Figure 41: Delete Block Area Group Button
Table 44: How to Delete a Block Area Grouping
Step |
Description |
Step 1 |
Zoom to the area of interest on the map. |
Step 2 |
Select the Delete Block Area Grouping button on the toolbar. Figure 41 shows this button. |
Step 3 |
Select the BAG to delete. Once deleted, the BAG cannot be restored. |
Step 4 |
Click OK to delete the BAG or click Cancel to cancel. |
Block boundary suggestions must be reviewed at least once before submitting updates to the Census Bureau. The GUPS Block Boundary Review Tool allows participants to systematically navigate to features on the map by 2030 “Most Hold” and “Do Not Hold” flags for review and further update if desired.
![]()
Figure 42: Review Block Boundary Tool Button
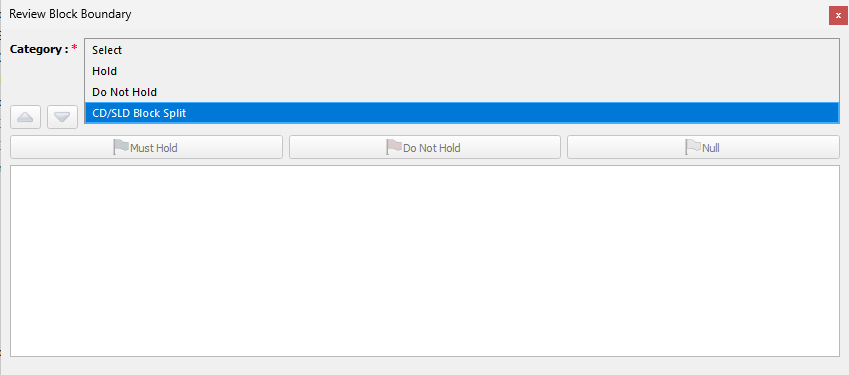
Figure 43: Review Block Boundary Tool Categories
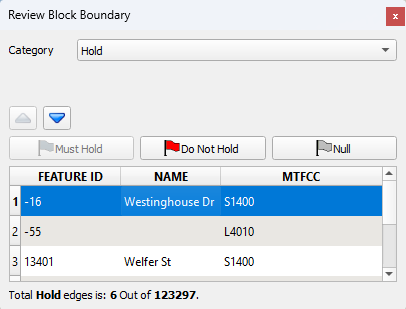
Figure 44: Example of Reviewing Must Hold Flags in the Review Block Boundary Tool
Table 45: How to Review Block Boundary Suggestions
Step |
Description |
Step 1 |
Open the Review Block Boundary button. Figure 42 shows this button. |
Step 2 |
Select the category of Hold or Do Not Hold. Figure 43 shows the interface. |
Step 3 |
Click on a row to select the feature and zoom to it on the map. Figure 44 shows this interface. |
Step 4 |
Review that this edge has the appropriate block boundary flag assigned to it. |
Step 5 |
If the flag is correct, no further action is needed. |
Step 6 |
To change the flag, use the Must Hold, Do Not Hold, or Null options within the tool to update the flag. |
Note: CD/SLD Split is an option in Step 2. This should only be selected when creating block splits for during Phase 4 Collection of Post-2020 Census Congressional and State Legislative District Plans and is not part of the BBSP update process.
The Potential Small Block Check reviews the edges within the project and returns a list of potential small blocks that exist in the project based on the planned and suggested block boundaries.
All small blocks under 3,000 square meters are identified and listed. Within this list of potential small blocks:
Type “ - “: Small blocks under 3,000 square meters that are created by the planned block boundaries and do not include “Must Hold” flags.
Type A: Small blocks of 500 square meters or less that have one or more bounding edges where a "Must Hold" flag is involved.
Type B: Small blocks of 500.1 square meters to 3,000 square meters that have one or more bounding edges where a "Must Hold" flag is involved.
If the small blocks are unwanted or unintentional, they can be adjusted through Block Boundary Suggestion Flagging (i.e., remove the “Must Hold” flag from a bounding edge or apply a “Do Not Hold” flag). Potential small blocks must be reviewed at least once before submitting updates to the Census Bureau.
![]()
Figure 45: Potential Small Block Check Button
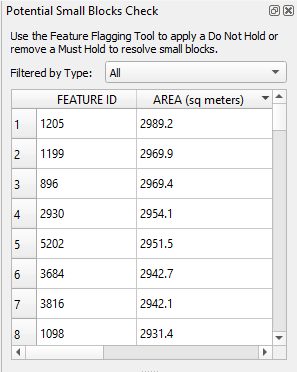
Figure 46: Potential Small Block Check Interface
Table 46: Running the Potential Small Block Check
Step |
Description |
Step 1 |
Click on the Potential Small Block Check button. Figure 45 shows this button. |
Step 2 |
Run the check. Review the potential small blocks by clicking on the records and use the filter option to play close attention to the Type A and Type B blocks. Figure 46 shows the interface. |
Step 3 |
Use the Feature Flagging Tool to make any desired changes to the potential small blocks (i.e., flag bounding edges as a “Do Not Hold” or use NULL to remove any “Must Hold” or “Do Not Hold” flags. |
Step 4 |
Rerun the Potential Small Block Check periodically to view the impact of the “Must Hold” and “Do Not Hold” flags. |
GUPS Standalone provides two general review tools, the Review Change Polygons and the Geography Review Tool, to review updated data layers.
The Review Change Polygon Tool contains two specific checks: Small Area Check and Find Holes. If there are changes to the boundary of the area landmark or legal entity, it’s required to initiate and perform both checks at least once before the GUPS will allow the creation of a data output file.
The Small Area Check looks for changes that are less than 500 square feet. This is important to ensure that those changes are correct and not slivers.
The Find Holes check identifies any areas surrounded by an entity but not included in the entity, creating a “hole.”
These “holes” may be legitimate, but they may also be the result of delineation errors.
This check also provides the ability to make changes to legal boundary updates as the original updates and possible holes are being reviewed.
Note: The Small Area Check looks for small areas involved in BAS updates while the Potential Small Block Check looks for potential small blocks created by existing edges and block boundary suggestions.
The Geography Review Tool is optional and allows for the review of the contents of all layers in the project. When opened the tool will have a drop-down list of all the layers and the option to view the original layer and changes (if applicable) to the layer. There are filtering and navigation buttons contained within the tool. However, no updates can be made using the Geography Review Tool.
![]()
Figure 47: Review Change Polygons Button
Open the Review Change Polygons Tool by clicking on the button on the toolbar. These will only be available if there are changes to the boundary of the area landmark or legal entity, it’s required to initiate and perform both checks at least once before the GUPS will allow the creation of a data output file.
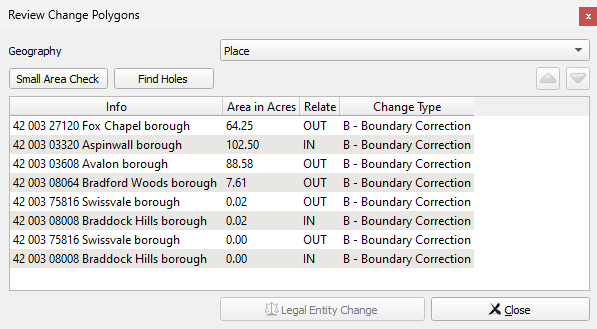 \
\
Figure 48: Review Change Polygons Interface
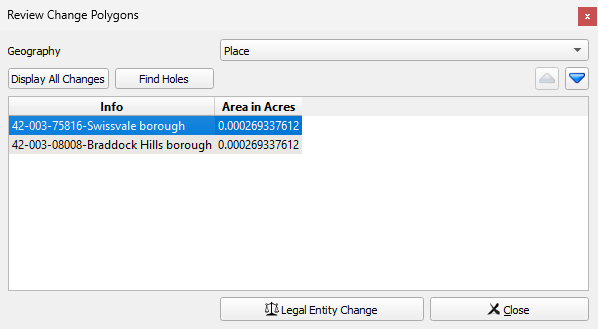
Figure 49: Review Change Polygon Small Area Check Interface
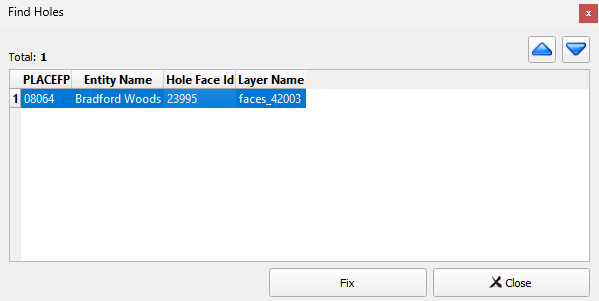
Figure 50: Review Change Polygon Find Holes Interface
Table 47: How to Review Change Polygons
Step |
Description |
Step 1 |
Save the project. |
Step 2 |
Select the Review Change Polygons button on the BBSP toolbar. Figure 47 shows this button. |
Step 3 |
The Review Change Polygon tool opens. Select the geography to be reviewed. Figure 48 shows the interface. Note: This may need to be repeated for each layer updated, for example if area landmarks and places were updated, the Small Area and Find Holes Check should be performed for the area landmark and place layer. |
Step 4 |
From the Review Change Polygons dialog window, select the Small Area Check button (Required).
|
Step 5 |
From the Review Change Polygons dialog window, select the Find Holes button (Required).
|
Step 6 |
From the Review Change Polygons dialog window, the Legal Entity Change button allows the Effective Date (EFF_DATE), Authorization Type (AUTHTYPE), Documentation (DOCU), and Change Type (CHNG_TYPE) to be updated (Optional). |
Step 7 |
If there are no issues found during the quality checks, participants are ready to export the files. If there are issues found, the file will be ready for export after the corrections are made. |
This is an optional review tool to review different geographies that have been edited in the project.
![]()
Figure 51: Geography Review Button
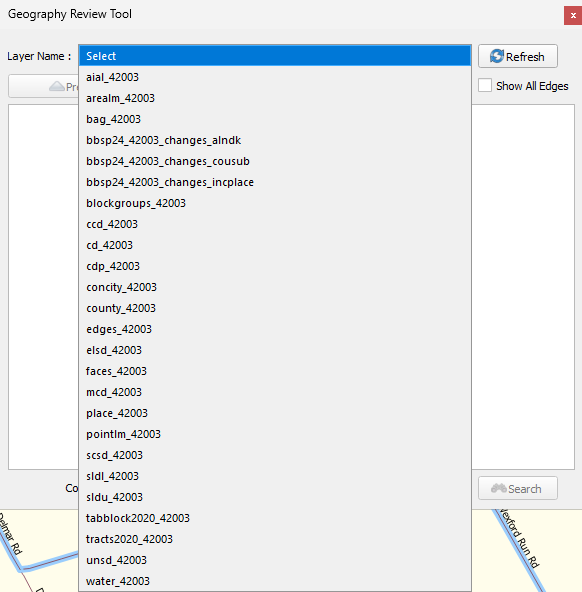
Figure 52: Geography Review Tool Interface
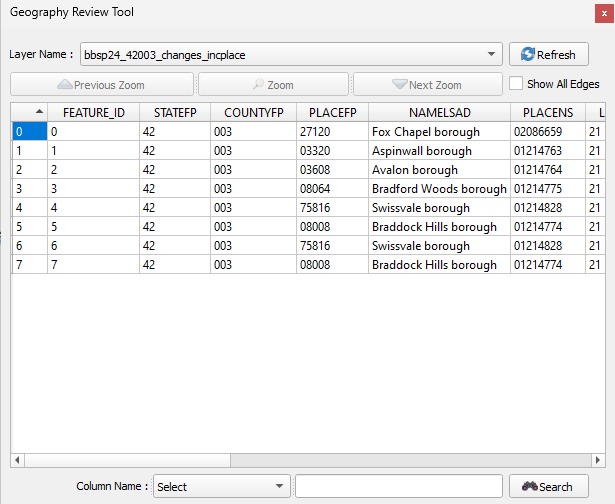
Figure 53: Geography Review Tool Results
Table 48: How to Perform a Geography Review
Step |
Description |
Step 1 |
Click the Geography Review Tool button on the BBSP Toolbar. Figure 51 shows this button. |
Step 2 |
The layers that include “_changes_” in the name are the files that may need to be reviewed. These layers are the transaction data output files for the type of geography included in the name, where changes have been made to the layer. Select the shapefile layer from the drop-down list for the geography to review, shown in Figure 52. The attribute table for the selected shapefile will display. Figure 53 shows the interface. |
Step 3 |
Use the scroll bar at the bottom of the page to scroll to the right to see additional columns in the attribute table. To see all the columns, left click the mouse on the edge of the dialog box and, while holding down the mouse, drag to widen the window. |
Step 4 |
Click on a row in the table and then click the Zoom button to zoom the map view to the boundary change polygon. |
Step 5 |
The Geography Review Tool does not include tools to make any updates. They will need to be made outside of the review tool using the appropriate tools in GUPS. |
The Census Bureau conducts the RDP activities through the official liaison appointed by the governor and legislative leadership of the state. The official liaisons are responsible for making BBSP updates and submitting the projects to the Census Bureau. However, the official liaisons have two options for designating technical liaisons to assist them in making BBSP updates on behalf of the state.
• Option 1. Official liaisons can formally designate technical liaisons who are able to perform geographic updates and submit completed updates to the Census Bureau on their behalf. Official liaisons should reach out to the RVDO at 301-763-4039 or <rdo@census.gov> to make technical liaison designations.
• Option 2. Official liaisons can delegate work to designees who perform the updates and submit the updates back to the official liaison. The official liaison will submit the work to the Census Bureau if they approve the work. If the official liaison determines that BBSP work completed by a designee requires changes or additional work, it is the official liaison's responsibility to decide whether to make the changes or return the project to their designee for further updates.
The liaison responsible for submitting updates to the Census Bureau should submit completed, county-level files on a flow basis to the Census Bureau through SWIM. Do not hold files to
submit all at once. Submit files as they are completed, especially at the beginning of the update period, so that the Census Bureau can provide feedback if there are errors, omissions, or other concerns
There are two options for exporting the GUPS project, Share with Another Participant and Export for Census.
![]()
Figure 54: Export to Zip Button
Use the Share with Another Participant option when the project is to be shared with another person for review prior to submission to the Census Bureau. This option bypasses any mandatory QC checks, and the output cannot be submitted to the Census Bureau.
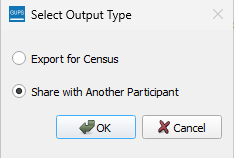
Figure 55: Share with Another Participant
Table 49: How to Create a Share with Participant Export
Step |
Description |
Step 1 |
Save the project. |
Step 2 |
Click the Export to Zip button on the toolbar. Figure 54 shows this button. |
Step 3 |
The Select Output Type dialog button opens and select the Share with Another Participant option. Figure 55 shows the interface. Note it may take several minutes for GUPS to create the .zip file. |
Step 4 |
The Output dialog opens and shows the location of the .zip file and allows the folder to be opened. Files created using the Share with Participant option will have the naming convention bbsp26_<ssccc>_DataDirectory.zip, ssccc is the state and county code. |
Use the Export for Census option when the project is ready for submission to the Census Bureau.
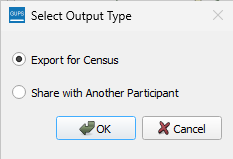
The Export for Census tool creates the submission .zip file the Census Bureau needs to process the updates.
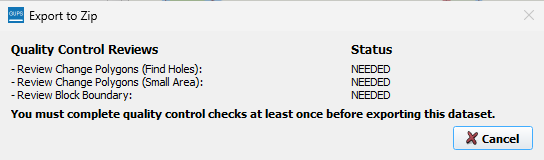
Figure 57: Export to Zip QC Required
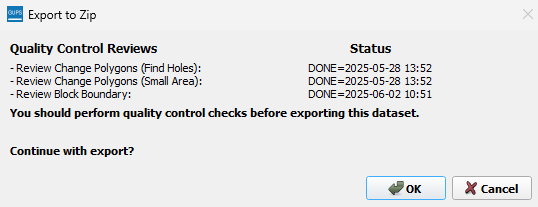
Figure 58: Export to Zip QC Complete
Table 50: How to Create an Export for Census
Step |
Description |
Step 1 |
Save the project. |
Step 2 |
Click the Export to Zip button on the BBSP Toolbar. Figure 54 shows this button. The Select Output Type dialog button opens and select the Export for Census option. Figure 56 shows the interface. |
Step 3 |
The Export to Zip dialog box opens and the status of the required quality control checks is listed including the date and time at which it was last performed. Each check must be initiated at least once before the dataset can be exported. Figure 57 shows this popup.
If there are quality control checks have not been run the Export to Census cannot be run. Click Cancel and then select the appropriate review tools from the toolbar. |
Step 4 |
Once all quality control checks have been run, the Select Output Type dialog button opens. Click OK to export. Figure 58 shows this popup. |
Step 5 |
The Output dialog opens and shows the location of the .zip File and allows the folder to be opened. Files created using the Export to Census option will have the naming conventions bbsp26_<ssccc>_return.zip, ssccc is the state and county code. |
All participants must use the Secure Web Incoming Module (SWIM) to submit their changes to the Census Bureau. Due to security requirements, the Census Bureau cannot accept submissions through File Transfer Protocol, email, or any protocol other than the SWIM site.
To upload and transmit update files to the Census Bureau, first access the SWIM user account.
Open a web browser window and enter the SWIM URL: https://respond.census.gov/swim
SWIM runs on the two most recent versions of each of these major browsers:
Microsoft Edge®
Google Chrome®
Mozilla Firefox®
Apple Safari®
Users who already have a SWIM account should proceed to Step 5 to log in.
Users who do not have a SWIM account should choose “Register Account:”
Enter the 12-digit token provided by the Census Bureau.
Create a password following the criteria below:
Username and password are case sensitive.
Password must be at least eight characters in length.
It must have at least one upper case character.
It must have at least one lower case character.
It must have at least one number.
It must have at least one special character (valid characters are: #, !, $, &, ?, ~).
Complete the registration information form.
Log in to SWIM using the user’s email address and password.
Upload a BBSP submission:
Select the “Start New Upload” button.
Select the “INSERT” radio button.
Select the State and County.
Select the “+ Add File” button.
Select the .zip file to upload.
Double-click on the .zip file to upload. Add additional .zip files in the same manner.
Add any additional information to the “Comments” field.
Choose “Next”. A “Thank You” screen appears.
Partnership Shapefiles reflect the legal boundaries and names for all governments, as reported through the previous year’s BAS. Participants can access the partnership shapefiles from two locations:
Download the partnership shapefiles from the Geography Partnership website at:
<www.census.gov/geographies/mapping-files/time-series/geo/partnership.html>
Download the partnership shapefiles from the FTP site at:
<https://www2.census.gov/geo/pvs/>
Census Bureau files are in GCS NAD83 format and can be projected into any local coordinate system/project. Most GIS software packages will allow users to transform file coordinate systems and projections.
State Level Shapefile Names – PVS_25_v2_<layername>_<SS>.shp where <SS> is the number corresponding to the state, for example, “24” and <shpname> is the abbreviation for the geography type represented in the shapefile.
Table 51: State Shapefile Names
Shapefile Layer |
<layername> |
Alaska Native Regional Corporation |
anrc |
American Indian / Alaska Native Areas – Statistical |
aias |
American Indian Areas – Legal |
aial |
American Indian Areas 2020 – Legal |
aial2020 |
American Indian Tribal Subdivisions – Legal |
aitsl |
American Indian Tribal Subdivisions – Statistical |
aitss |
Congressional Districts |
cd |
Core Based Statistical Areas |
cbsa |
Hawaiian Home Lands |
hhl |
School Districts (Elementary) |
elsd |
School Districts (Secondary) |
scsd |
School Districts (Unified) |
unsd |
School Districts Administrative Areas |
sdadm |
State Legislative Districts (Upper / Senate) |
sldu |
State Legislative Districts (Lower / House) |
sldl |
Public Use Microdata Areas 2020 |
puma2020 |
2020 Census Tracts |
tracts2020 |
Census Designated Places |
cdp |
Counties and Equivalent Areas |
county |
Counties and Equivalent Areas 2020 |
county2020 |
County Subdivisions – Legal |
mcd |
Incorporated Places |
place |
States and Equivalent Areas |
state |
Tribal Block Groups |
tbg |
Tribal Census Tracts |
tct |
Urban Areas Census 2020 |
uac |
Block Area Grouping |
bag |
County Level Shapefile Names – PVS_25_v2_<layername>_<SSCCC>.shp, where <SSCCC> is the number corresponding to the state and county, for example, “24001” and <shpname> is the abbreviation for the geography type represented in the shapefile.
Table 52: County Shapefile Names
Shapefile Layer |
<layername> |
Alaska Native Regional Corporation |
anrc |
American Indian / Alaska Native Areas – Statistical |
aias |
American Indian Areas – Legal |
aial |
American Indian Tribal Subdivisions – Legal |
aitsl |
American Indian Tribal Subdivisions – Statistical |
aitss |
Congressional Districts |
cd |
Core Based Statistical Areas |
cbsa |
Hawaiian Home Lands |
hhl |
School Districts (Elementary) |
elsd |
School Districts (Secondary) |
scsd |
School Districts (Unified) |
unsd |
School Districts Administrative Areas |
sdadm |
State Legislative Districts (Upper / Senate) |
sldu |
State Legislative Districts (Lower / House) |
sldl |
Public Use Microdata Areas 2020 |
puma2020 |
Urban Growth Areas |
uga |
Census Block Groups |
bg |
Census Blocks – Current |
tabblock |
Census Blocks – 2020 Census |
tabblock2020 |
Census Tracts – Current |
curtracts |
2020 Census Tracts |
tracts2020 |
Census Designated Places |
cdp |
Consolidated Cities |
concity |
Counties and Equivalent Areas |
county |
County Subdivisions for counties with Legal Subdivisions |
mcd |
County Subdivisions for counties with Legal Subdivisions |
ccd |
Incorporated Places |
places |
Subbarios |
submcd |
Tribal Block Groups |
tbg |
Tribal Census Tracts |
tct |
Urban Areas 2020 Census |
uac |
All Lines |
edges |
Area Landmarks |
arealm |
Hydrography – Area |
water |
Point Landmarks |
pointlm |
Geographic Offsets |
offset |
Block Area Grouping |
bag |
Face Geometry with all geocodes |
faces |
The tables in this section show the shapefile layouts for the county-level partnership shapefiles that are in the GUPS Standalone project.
Table 53: All Lines (Edges) Shapefile (PVS_25_v2_edges)
Attribute Field |
Length |
Type |
Description |
STATEFP |
2 |
Char |
FIPS State Code |
COUNTYFP |
3 |
Char |
FIPS County Code |
TLID |
10,0 |
Number |
Permanent Edge ID |
TFIDL |
10,0 |
Number |
Permanent Face ID, Left |
TFIDR |
10,0 |
Number |
Permanent Face ID, Right |
MTFCC |
5 |
Char |
MAF/TIGER Feature Class Code |
FIDELITY |
1 |
Char |
Indication to a respondent when their entity boundary has changed through spatial enhancement |
FULLNAME |
40 |
Char |
Decoded Feature Name with abbreviated qualifier, direction, and feature type |
SMID |
22,0 |
Number |
Spatial Tmeta ID |
SMIDTYPE |
1 |
VARCHAR2 |
Source attribution for boundary edges. PLSS, Parcels, Surveyed, etc. |
RTTYP |
1 |
VARCHAR2 |
Route type code |
BBSPFLG |
1 |
Char |
Indicates the Redistricting Data Project participant's submitted request of an EDGE for selection for holding. |
CBBFLG |
1 |
Char |
Indicates the status of an EDGE for a selection as tabulation block boundary |
BBSP_2030 |
1 |
Char |
New BBSP Flag |
CHNG_TYPE |
4 |
Char |
Type of area update |
JUSTIFY |
150 |
Char |
Justification |
LTOADD |
10 |
Char |
Left to address |
RTOADD |
10 |
Char |
Right to address |
LFROMADD |
10 |
Char |
Left from address |
RFROMADD |
10 |
Char |
Right from address |
ZIPL |
5 |
Char |
Left from ZIP Code |
ZIPR |
5 |
Char |
Right from ZIP Code |
EXTTYP |
1 |
Char |
Extension type |
MTUPDATE |
10 |
date |
Date of last update to the edge |
Table 54: Area Landmark Shapefile (PVS_25_v2_arealm)
Attribute Field |
Length |
Type |
Description |
STATEFP |
2 |
String |
State code |
COUNTYFP |
3 |
String |
County code |
MTFCC |
5 |
String |
MAF/TIGER Feature Class Code |
FULLNAME |
120 |
String |
Complete name associated with the area landmark |
AREAID |
22 |
String |
Landmark identification number, or Object ID |
ANSICODE |
8 |
String |
American National Standards Institute feature code for the county or equivalent area feature code for the area landmark |
PARTFLG |
1 |
String |
Part flag indicator, indicates if only part of a feature is represented |
CHNG_TYPE |
2 |
String |
Type of area update |
EFF_DATE |
10 |
Date |
Effective date or vintage |
RELATE |
120 |
String |
Relationship description |
JUSTIFY |
150 |
String |
Justification |
BAG |
3 |
String |
Block area grouping |
Table 55: Block Area Grouping Shapefile (PVS_25_v2_bag)
Attribute Field |
Length |
Type |
Description |
STATEFP |
2 |
Char |
FIPS State Code |
COUNTYFP |
3 |
Char |
FIPS County Code |
CHNG_TYPE |
2 |
Char |
Type of area update |
NEW_CODE |
6 |
Char |
New Census BAG Code |
BAGCE |
3 |
Char |
Block Area Grouping |
VINTAGE |
2 |
Char |
Vintage |
Table 56: Census Blocks- 2020 (PVS_25_v2_tabblock2020)
Attribute Field |
Length |
Type |
Description |
STATEFP20 |
2 |
Char |
FIPS State Code |
COUNTYFP20 |
3 |
Char |
FIPS County Code |
TRACTCE20 |
6 |
Char |
Census Tract Code |
BLOCKCE |
4 |
Char |
Tabulation block number |
BLOCKID20 |
15 |
Char |
FIPS State Code, FIPS County Code, Census Tract Code, Tabulation Block Number |
PARTFLG |
1 |
Char |
Part flag indicator |
HOUSING20 |
9,0 |
Number |
2020 Housing |
POP20 |
9,0 |
Number |
2020 Population Count |
Table 57: Congressional Districts (PVS_25_v2_cd)
Attribute Field |
Length |
Type |
Description |
STATEFP |
2 |
Char |
FIPS State Code |
COUNTYFP |
3 |
Char |
FIPS County Code |
CDFP |
2 |
Char |
Congressional District Code |
CDTYP |
1 |
Char |
Congressional District Type |
NAMELSAD |
100 |
Char |
Name with translated LSAD |
LSAD |
2 |
Char |
Legal/Statistical Area Description |
PARTFLG |
1 |
Char |
Part flag indicator |
CHNG_TYPE |
2 |
Char |
Type of area update |
EFF_DATE |
8 |
Date |
Effective date or vintage |
NEW_CODE |
2 |
Char |
New Congressional District Code |
RELTYPE1 |
2 |
Char |
Relationship Type1 |
RELTYPE2 |
2 |
Char |
Relationship Type2 |
RELTYPE3 |
2 |
Char |
Relationship Type3 |
RELTYPE4 |
2 |
Char |
Relationship Type4 |
RELTYPE5 |
2 |
Char |
Relationship Type5 |
REL_ENT1 |
8 |
Char |
Relationship Entity1 |
REL_ENT2 |
8 |
Char |
Relationship Entity2 |
REL_ENT3 |
8 |
Char |
Relationship Entity3 |
REL_ENT4 |
8 |
Char |
Relationship Entity4 |
REL_ENT5 |
8 |
Char |
Relationship Entity5 |
RELATE |
120 |
Char |
Relationship description |
JUSTIFY |
150 |
Char |
Justification |
CDSESSN |
3 |
Char |
Congressional District Session Code |
NAME |
100 |
Char |
Base Name portion of the Standardized Name |
VINTAGE |
2 |
Char |
Vintage |
FUNCSTAT |
1 |
Char |
Functional Status |
Table 58: Counties and Equivalent Areas (PVS_25_v2_county)
Attribute Field |
Length |
Type |
Description |
STATEFP |
2 |
Char |
FIPS State Code |
COUNTYFP |
3 |
Char |
FIPS county code |
BASID |
11 |
Char |
11-digit Boundary and Annexation Survey (BAS) ID |
COUNTYNS |
8 |
Char |
ANSI feature code for county or equivalent feature |
NAMELSAD |
100 |
Char |
Name with translated LSAD |
LSAD |
2 |
Char |
Legal/Statistical Area Description |
FUNCSTAT |
1 |
Char |
Functional Status |
CLASSFP |
2 |
Char |
FIPS 55 class code describing an entity |
CHNG_TYPE |
2 |
Char |
Type of area update |
EFF_DATE |
8 |
Date |
Effective date or vintage |
AUTHTYPE |
1 |
Char |
Authorization type for legal area updates |
DOCU |
120 |
Char |
Supporting documentation |
AREA |
10,3 |
Number |
Acreage of area update |
RELATE |
120 |
Char |
Relationship description |
JUSTIFY |
150 |
Char |
Justification |
NAME |
100 |
Char |
Name |
VINTAGE |
2 |
Char |
Vintage |
Table 59:Minor Civil Divisions (PVS_25_v2_mcd)
Attribute Field |
Length |
Type |
Description |
STATEFP |
2 |
Char |
FIPS State Code |
COUNTYFP |
3 |
Char |
FIPS county code |
COUSUBFP |
5 |
Char |
FIPS 55 County Subdivision code |
BASID |
11 |
Char |
11-digit Boundary and Annexation Survey (BAS) ID |
NAMELSAD |
100 |
Char |
Name with translated LSAD |
COUSUBNS |
8 |
Char |
ANSI feature code for the county subdivision |
LSAD |
2 |
Char |
Legal/Statistical Area Description |
FUNCSTAT |
1 |
Char |
Functional Status |
CLASSFP |
2 |
Char |
FIPS 55 class code describing an entity |
CHNG_TYPE |
2 |
Char |
Type of area update |
EFF_DATE |
8 |
Date |
Effective date or vintage |
AUTHTYPE |
1 |
Char |
Authorization type for legal area updates |
DOCU |
120 |
Char |
Supporting documentation |
AREA |
10,3 |
Number |
Acreage of area update |
RELATE |
120 |
Char |
Relationship description |
JUSTIFY |
150 |
Char |
Justification |
NAME |
100 |
Char |
Name |
VINTAGE |
2 |
Char |
Vintage |
Table 60: Faces (PVS_25_v2_faces)
Attribute Field |
Length |
Type |
Description |
TFID |
20 |
Number |
Permanent Face ID |
STATEFP |
2 |
Char |
FIPS State Code |
COUNTYFP |
3 |
Char |
FIPS County Code |
TRIBSUBCE |
3 |
Char |
Census Tribal Subdivision Code |
TTRACTCE |
6 |
Char |
Tribal Census tract Code |
TBLKGRPCE |
1 |
Char |
Tribal Census Block Group Code |
AIANNHCE |
4 |
Char |
Current Census AIANNH code |
AIANNHCE20 |
4 |
Char |
2020 Census AIANNH code |
COMPTYP |
1 |
Char |
Indicates if reservation (or equivalent) or off-reservation trust land is present |
ANRCFP |
5 |
Char |
FIPS ANRC Code |
SLDUST |
3 |
Char |
SLD Upper Chamber Code |
SLDLST |
3 |
Char |
SLD Lower Chamber Code |
ELSD |
5 |
Char |
Current ELSD Local Education Agency (LEA) Code |
SCSD |
5 |
Char |
Current SCSD Local Education Agency (LEA) Code |
UNSD |
5 |
Char |
Current UNSD Local Education Agency (LEA) Code |
SDADM |
5 |
Char |
Current SDADM Local Education Agency (LEA) Code |
CDFP |
2 |
Char |
Congressional District Code |
TRACTCE |
6 |
Char |
Census Tract Code |
UACE |
5 |
Char |
Census Urban Area Code |
CBSAFP |
5 |
Char |
FIPS CBSA Code |
BLKGRPCE |
1 |
Char |
Census Block Group Code |
BLOCKCE |
4 |
Char |
Tabulation block number |
SUFFIX1CE |
2 |
Char |
Census Block Suffix 1 |
SUFFIX2CE |
2 |
Char |
Census Block Suffix 2 |
BAGCE |
3 |
Char |
Block Area Grouping |
PUMACE20 |
5 |
Char |
Public Use Microdata Area Code 2020 |
SUBMCDFP |
5 |
Char |
FIPS 55 Sub-Minor Civil Division Code |
UGACE |
5 |
Char |
Urban Growth Area code |
STATEFP20 |
2 |
Char |
FIPS State Code |
COUNTYFP20 |
3 |
Char |
FIPS county code |
TRACTCE20 |
6 |
Char |
Census Tract Code |
PLACEFP |
5 |
Char |
FIPS 55 Place Code |
COUSUBFP |
5 |
Char |
FIPS 55 County Subdivision code |
CONCITYFP |
5 |
Char |
FIPS 55 Place Code |
CDSESSN |
3 |
Char |
Congressional District Session Code |
LWFLG |
1 |
Char |
Land/Water Flag |
Table 61: Water (PVS_25_v2_water)
Attribute Field |
Length |
Type |
Description |
STATEFP |
2 |
Char |
FIPS State Code |
COUNTYFP |
3 |
Char |
FIPS County Code |
ANSICODE |
8 |
Char |
Represents the official code for use by Federal agencies for data transfer and dissemination. |
MTFCC |
5 |
Char |
MAF/TIGER Feature Class Code |
FULLNAME |
120 |
Char |
Prefix Direction Code, Prefix Type code, Base Name, Suffix Type Code, Suffix Direction code |
CHNG_TYPE |
2 |
Char |
Type of area update |
HYDROID |
22 |
Char |
Object ID |
RELATE |
120 |
Char |
Relationship description |
JUSTIFY |
150 |
Char |
Justification |
Table 62: Incorporated Place (PVS_25_v2_place)
Attribute Field |
Length |
Type |
Description |
STATEFP |
2 |
Char |
FIPS State Code |
COUNTYFP |
3 |
Char |
FIPS county code |
PLACEFP |
5 |
Char |
FIPS 55 Place Code |
BASID |
11 |
Char |
11-digit Boundary and Annexation Survey (BAS) ID |
NAMELSAD |
100 |
Char |
Name with translated LSAD |
PLACENS |
8 |
Char |
ANSI feature code for the place |
LSAD |
2 |
Char |
Legal/Statistical Area Description |
FUNCSTAT |
1 |
Char |
Functional Status |
CLASSFP |
2 |
Char |
FIPS 55 class code describing an entity |
PARTFLG |
1 |
Char |
Part flag indicator |
CHNG_TYPE |
2 |
Char |
Type of area update |
EFF_DATE |
8 |
Date |
Effective date or vintage |
AUTHTYPE |
1 |
Char |
Authorization type for legal area updates |
DOCU |
120 |
Char |
Supporting documentation |
AREA |
10,3 |
Number |
Acreage of area update |
RELATE |
120 |
Char |
Relationship description |
JUSTIFY |
150 |
Char |
Justification |
NAME |
100 |
Char |
Name |
VINTAGE |
2 |
Char |
Vintage |
Table 63: State Legislative Districts (Upper/Senate) (PVS_25_v2_sldu)
Attribute Field |
Length |
Type |
Description |
STATEFP |
2 |
Char |
FIPS State Code |
COUNTYFP |
3 |
Char |
FIPS county code |
SLDUST |
3 |
Char |
SLD Upper Chamber Code |
NAMELSAD |
100 |
Char |
Name with translated LSAD |
LSAD |
2 |
Char |
Legal/Statistical Area Description |
PARTFLG |
1 |
Char |
Part flag indicator |
CHNG_TYPE |
2 |
Char |
Type of area update |
EFF_DATE |
8 |
Date |
Effective date or vintage |
NEW_NAME |
100 |
Char |
New SLDU name |
NEW_CODE |
3 |
Char |
New SLDU code |
RELTYPE1 |
2 |
Char |
Relationship Type1 |
RELTYPE2 |
2 |
Char |
Relationship Type2 |
RELTYPE3 |
2 |
Char |
Relationship Type3 |
RELTYPE4 |
2 |
Char |
Relationship Type4 |
RELTYPE5 |
2 |
Char |
Relationship Type5 |
REL_ENT1 |
8 |
Char |
Relationship Entity1 |
REL_ENT2 |
8 |
Char |
Relationship Entity2 |
REL_ENT3 |
8 |
Char |
Relationship Entity3 |
REL_ENT4 |
8 |
Char |
Relationship Entity4 |
REL_ENT5 |
8 |
Char |
Relationship Entity5 |
RELATE |
120 |
Char |
Relationship description |
JUSTIFY |
150 |
Char |
Justification |
LSY |
4 |
Char |
Legislative Session Year |
NAME |
100 |
Char |
Base Name portion of the Standardized Name |
VINTAGE |
2 |
Char |
Vintage |
FUNCSTAT |
1 |
Char |
Functional Status |
Table 64: State Legislative Districts (Lower/House) (PVS_25_v2_sldl)
Attribute Field |
Length |
Type |
Description |
STATEFP |
2 |
Char |
FIPS State Code |
COUNTYFP |
3 |
Char |
FIPS county code |
SLDLST |
3 |
Char |
SLD Lower Chamber Code |
NAMELSAD |
100 |
Char |
Name with translated LSAD |
LSAD |
2 |
Char |
Legal/Statistical Area Description |
PARTFLG |
1 |
Char |
Part flag indicator |
CHNG_TYPE |
2 |
Char |
Type of area update |
EFF_DATE |
8 |
Date |
Effective date or vintage |
NEW_NAME |
100 |
Char |
New SLDL name |
NEW_CODE |
3 |
Char |
New SLDL code |
RELTYPE1 |
2 |
Char |
Relationship Type1 |
RELTYPE2 |
2 |
Char |
Relationship Type2 |
RELTYPE3 |
2 |
Char |
Relationship Type3 |
RELTYPE4 |
2 |
Char |
Relationship Type4 |
RELTYPE5 |
2 |
Char |
Relationship Type5 |
REL_ENT1 |
8 |
Char |
Relationship Entity1 |
REL_ENT2 |
8 |
Char |
Relationship Entity2 |
REL_ENT3 |
8 |
Char |
Relationship Entity3 |
REL_ENT4 |
8 |
Char |
Relationship Entity4 |
REL_ENT5 |
8 |
Char |
Relationship Entity5 |
RELATE |
120 |
Char |
Relationship description |
JUSTIFY |
150 |
Char |
Justification |
LSY |
4 |
Char |
Legislative Session Year |
NAME |
100 |
Char |
Base Name portion of the Standardized Name |
VINTAGE |
2 |
Char |
Vintage |
FUNCSTAT |
1 |
Char |
Functional Status |
Table 65: American Indian/Alaska Native Areas- Legal (PVS_25_v2_aial)
Attribute Field |
Length |
Type |
Description |
STATEFP |
2 |
Char |
FIPS State Code |
COUNTYFP |
3 |
Char |
FIPS County Code |
BASID |
11 |
Char |
11-digit Boundary and Annexation Survey (BAS) ID |
AIANNHCE |
4 |
Char |
Census AIANNH code |
COMPTYP |
1 |
Char |
Indicates if reservation (or equivalent) or off-reservation trust land is present, or both |
AIANNHFSR |
1 |
Char |
Flag indicating level of recognition of an American Indian, Alaska Native, or Native Hawaiian tribe or group |
NAMELSAD |
100 |
Char |
Name with translated LSAD |
AIANNHNS |
8 |
Char |
ANSI numeric identifier for AIANNH Areas |
LSAD |
2 |
Char |
Legal/Statistical Area Description |
FUNCSTAT |
1 |
Char |
Functional Status |
CLASSFP |
2 |
Char |
FIPS 55 class code describing an entity |
PARTFLG |
1 |
Char |
Part flag indicator |
CHNG_TYPE |
2 |
Char |
Type of area update |
EFF_DATE |
8 |
Date |
Effective date or vintage |
AUTHTYPE |
1 |
Char |
Authorization type for legal area updates |
DOCU |
120 |
Char |
Supporting documentation |
AREA |
10,3 |
Number |
Acreage of area update |
RELATE |
120 |
Char |
Relationship description |
JUSTIFY |
150 |
Char |
Justification |
NAME |
100 |
Char |
Name |
VINTAGE |
2 |
Char |
Vintage |
Table 66: School Districts - Elementary (PVS_25_v2_elsd)
Attribute Field |
Length |
Type |
Description |
STATEFP |
2 |
Char |
FIPS State Code |
COUNTYFP |
3 |
Char |
FIPS county code |
SDLEA |
5 |
Char |
Current ELSD Local Education Agency (LEA) Code |
NAME |
100 |
Char |
Base Name portion of the Standardized Name |
LSAD |
2 |
Char |
Legal/Statistical Area Description |
LOGRADE |
2 |
Char |
Low grade |
HIGRADE |
2 |
Char |
High grade |
PARTFLG |
1 |
Char |
Part flag indicator |
SDTYP |
1 |
Char |
Census School District Type |
POLYID |
4 |
Char |
Record ID for each ELSD Update polygon for linking to the Submission Log |
CHNG_TYPE |
2 |
Char |
Type of area update |
EFF_DATE |
8 |
Date |
Effective date or vintage |
RELATE |
120 |
Char |
Relationship description |
JUSTIFY |
150 |
Char |
Justification |
FUNCSTAT |
1 |
Char |
Functional Status |
VINTAGE |
2 |
Char |
Vintage |
Table 67: School Districts- Secondary (PVS_25_v2_scsd)
Attribute Field |
Length |
Type |
Description |
STATEFP |
2 |
Char |
FIPS State Code |
COUNTYFP |
3 |
Char |
FIPS county code |
SDLEA |
5 |
Char |
Current SCSD Local Education Agency (LEA) Code |
NAME |
100 |
Char |
Base Name portion of the Standardized Name |
LSAD |
2 |
Char |
Legal/Statistical Area Description |
LOGRADE |
2 |
Char |
Low grade |
HIGRADE |
2 |
Char |
High grade |
PARTFLG |
1 |
Char |
Part flag indicator |
SDTYP |
1 |
Char |
Census School District Type |
POLYID |
4 |
Char |
Record ID for each SCSD update polygon for linking the Submission Log |
CHNG_TYPE |
2 |
Char |
Type of area update |
EFF_DATE |
8 |
Date |
Effective date or vintage |
RELATE |
120 |
Char |
Relationship description |
JUSTIFY |
150 |
Char |
Justification |
FUNCSTAT |
1 |
Char |
Functional Status |
VINTAGE |
2 |
Char |
Vintage |
Table 68: School Districts- Unified (PVS_25_v2_unsd)
Attribute Field |
Length |
Type |
Description |
STATEFP |
2 |
Char |
FIPS State Code |
COUNTYFP |
3 |
Char |
FIPS county code |
SDLEA |
5 |
Char |
Current UNSD Local Education Agency (LEA) Code |
NAME |
100 |
Char |
Base Name portion of the Standardized Name |
LSAD |
2 |
Char |
Legal/Statistical Area Description |
LOGRADE |
2 |
Char |
Low grade |
HIGRADE |
2 |
Char |
High grade |
PARTFLG |
1 |
Char |
Part flag indicator |
SDTYP |
1 |
Char |
Census School District Type |
POLYID |
4 |
Char |
Record ID for each UNSD update polygon for linking to the Submission Log |
CHNG_TYPE |
2 |
Char |
Type of area update |
EFF_DATE |
8 |
Date |
Effective date or vintage |
RELATE |
120 |
Char |
Relationship description |
JUSTIFY |
150 |
Char |
Justification |
FUNCSTAT |
1 |
Char |
Functional Status |
VINTAGE |
2 |
Char |
Vintage |
Table 69: Census Block Groups (PVS_25_v2_bg)
Attribute Field |
Length |
Type |
Description |
STATEFP |
2 |
Char |
FIPS State Code |
COUNTYFP |
3 |
Char |
FIPS County Code |
TRACTCE |
6 |
Char |
Census Tract Code |
BLKGRPCE |
1 |
Char |
Block Group Code |
BLKGRPID |
12 |
Char |
FIPS State code, FIPS County Code, Census Tract Code, Block Group Code |
CHNG_TYPE |
2 |
Char |
Type of area update |
EFF_DATE |
8 |
Date |
Effective date or vintage |
BGTYP |
1 |
Char |
Block Group Characteristic Flag |
RELATE |
120 |
Char |
Relationship description |
JUSTIFY |
150 |
Char |
Justification |
VINTAGE |
2 |
Char |
Vintage |
Table 70: Census Tracts- 2020 (PVS_25_v2_tracts2020)
Attribute Field |
Length |
Type |
Description |
STATEFP |
2 |
Char |
FIPS State Code |
COUNTYFP |
3 |
Char |
FIPS County Code |
TRACTCE |
6 |
Char |
Census Tract Code |
NAME |
100 |
Char |
Base Name portion of the Standardized Name |
TRACTID |
11 |
Char |
FIPS State Code, FIPS County Code, Census Tract Code |
CHNG_TYPE |
2 |
Char |
Type of area update |
EFF_DATE |
8 |
Date |
Effective date or vintage |
TRACTTYP |
1 |
Char |
Tract Characteristic Flag |
RELATE |
120 |
Char |
Relationship description |
JUSTIFY |
150 |
Char |
Justification |
TRACTLABEL |
7 |
Char |
Tract number used for LUCA geocoding |
PARTFLG |
1 |
Char |
Part flag indicator |
VINTAGE |
2 |
Char |
Vintage |
POP20 |
9,0 |
Number |
2020 Population |
Table 71: Census Designated Places (PVS_25_v2_cdp)
Attribute Field |
Length |
Type |
Description |
STATEFP |
2 |
Char |
FIPS State Code |
COUNTYFP |
3 |
Char |
FIPS County Code |
PLACEFP |
5 |
Char |
FIPS 55 Place Code |
PLACENS |
8 |
Char |
ANSI feature code for the place |
NAMELSAD |
100 |
Char |
Name with translated LSAD |
LSAD |
2 |
Char |
Legal/Statistical Area Description |
FUNCSTAT |
1 |
Char |
Functional Status |
CLASSFP |
2 |
Char |
FIPS 55 class code describing an entity |
PARTFLG |
1 |
Char |
Part flag indicator |
CHNG_TYPE |
2 |
Char |
Type of area update |
EFF_DATE |
8 |
Date |
Effective date or vintage |
RELATE |
120 |
Char |
Relationship description |
JUSTIFY |
150 |
Char |
Justification |
NAME |
100 |
Char |
Name |
VINTAGE |
2 |
Char |
Vintage |
Table 72: Consolidated Cities (PVS_25_v2_concity)
Attribute Field |
Length |
Type |
Description |
STATEFP |
2 |
Char |
FIPS State Code |
COUNTYFP |
3 |
Char |
FIPS county code |
CONCITYFP |
5 |
Char |
FIPS 55 Place Code |
BASID |
11 |
Char |
11-digit Boundary and Annexation Survey (BAS) ID |
NAMELSAD |
100 |
Char |
Name with translated LSAD |
PLACENS |
8 |
Char |
ANSI feature code for the place |
LSAD |
2 |
Char |
Legal/Statistical Area Description
|
FUNCSTAT |
1 |
Char |
Functional Status |
CLASSFP |
2 |
Char |
FIPS 55 class code describing an entity |
CHNG_TYPE |
2 |
Char |
Type of area update |
EFF_DATE |
8 |
Date |
Effective date or vintage |
AUTHTYPE |
1 |
Char |
Authorization type for legal area updates |
DOCU |
120 |
Char |
Supporting documentation |
AREA |
10,3 |
Number |
Acreage of area update |
RELATE |
120 |
Char |
Relationship description |
JUSTIFY |
150 |
Char |
Justification |
NAME |
100 |
Char |
Name |
VINTAGE |
2 |
Char |
Vintage |
Table 73: Census County Divisions (PVS_25_v2_ccd)
Attribute Field |
Length |
Type |
Description |
STATEFP |
2 |
Char |
FIPS State Code |
COUNTYFP |
3 |
Char |
FIPS county code |
COUSUBFP |
5 |
Char |
FIPS 55 County Subdivision code |
NAMELSAD |
100 |
Char |
Name with translated LSAD |
COUSUBNS |
8 |
Char |
ANSI feature code for the county subdivision |
LSAD |
2 |
Char |
Legal/Statistical Area Description |
FUNCSTAT |
1 |
Char |
Functional Status |
CLASSFP |
2 |
Char |
FIPS 55 class code describing an entity |
CHNG_TYPE |
2 |
Char |
Type of point update |
RELATE |
120 |
Char |
Relationship description |
JUSTIFY |
150 |
Char |
Justification |
NAME |
100 |
Char |
Name |
VINTAGE |
2 |
Char |
Vintage |
Table 74: Address Range Relationship Table (PVS_25_v2_addr)
Attribute Field |
Length |
Type |
Description |
TLID |
10 |
Number |
TIGER Line ID |
STATEFP |
2 |
Char |
FIPS State Code |
COUNTYFP |
3 |
Char |
FIPS County Code |
FROMHN |
12 |
Char |
From House Number |
TOHN |
12 |
Char |
To House Number |
SIDE |
1 |
Char |
Side Indicator Flag |
ZIP |
5 |
Char |
5-digit ZIP code |
PLUS4 |
4 |
Char |
ZIP +4 code |
LFROMADD |
10 |
Char |
|
LTOADD |
10 |
Char |
|
RFROMADD |
10 |
Char |
|
RTOADD |
10 |
Char |
|
ZIPL |
5 |
Char |
|
ZIPR |
5 |
Char |
|
ZIP4L |
4 |
Char |
|
Table 75: Linear Feature Names- Fielded Relationship Table (PVS_25_v2_allnames)
Attribute Field |
Length |
Type |
Description |
OID_1 |
22 |
Char |
Object ID |
STATEFP |
2 |
Char |
FIPS State Code |
COUNTYFP |
3 |
Char |
FIPS County Code |
TLID |
10 |
Number |
TIGER Line ID |
NAME |
100 |
Char |
Base Name portion of the Standardized Name |
PREDIR |
2 |
Char |
Prefix Direction code component of the Feature Name |
PRETYP |
14 |
Char |
Prefix Type Description component of the Feature Name |
PREQUAL |
5 |
Char |
Prefix Qualifier code component of the feature Name |
SUFDIR |
2 |
Char |
Suffix Direction code component of the feature Name |
SUFTYP |
14 |
Char |
Suffix Type Description component of the Feature Name |
SUFQUAL |
5 |
Char |
Suffix Qualifier Code component of the Feature Name |
MTFCC |
5 |
Char |
MAF/TIGER Class Code |
PAFLAG |
1 |
Char |
Primary/alternate flag |
OID_1 |
22 |
Char |
Object ID |
STATEFP |
2 |
Char |
FIPS State Code |
COUNTYFP |
3 |
Char |
FIPS County Code |
TLID |
10 |
Number |
TIGER Line ID |
NAME |
100 |
Char |
Base Name portion of the Standardized Name |
PREDIR |
2 |
Char |
Prefix Direction code component of the Feature Name |
The MTFCC is a 5-digit code assigned by the Census Bureau to classify and describe geographic objects or features. A full list of MTFCC codes and descriptions can be found at <www.census.gov/library/reference/code-lists/mt-feature-class-codes.html>.

| File Type | application/vnd.openxmlformats-officedocument.wordprocessingml.document |
| File Modified | 0000-00-00 |
| File Created | 0000-00-00 |
© 2026 OMB.report | Privacy Policy